Linux Quota - installation and configuration on Ubuntu and Debian
Quota allows you to specify limits on two aspects of disk storage: the number of inodes a user or a group of users may possess; and the number of disk blocks that may be allocated to a user or a group of users. The idea behind quota is that users are forced to stay under their disk consumption limit, taking away their ability to consume unlimited disk space on a system. Quota is handled on a per user, per file system basis. If there is more than one file system which a user is expected to create files, then quota must be set for each file system separately. Various tools are available for you to administer and automate quota policies on your system.
Installation.
You can simply go ahead and install quota on ubuntu systems by running:
sudo apt-get install quota
for Debian use the install command without sudo:
apt-get install quota
This command should install quota on your system. Now after the installation we are about to edit our /etc/fstab file further in the setup:
sudo -
nano /etc/fstab
You will probably have your fstabfile open and it will look something like:
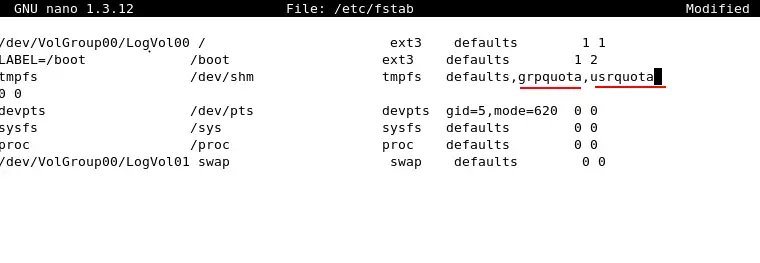
You may add the above lines to your fstab file with your desired drive to be used under quota. You may change the usrquota to grpquota as per the requirement. Next you will have to restart your system, or you can just go ahead and type:
mount -o remount /your_drive rw (this will or your partition on which quota was selected)
The above should do the trick instead of a restart. You also have an alternative of editing the /etc/fstab file, you may use:
mount -o remount,usrquota /your_drive rw
The above commmannd will just add the particular drive under quota until next restart. You may change the usrquota to grpquota as per the requirement. It can also be used if you are just trying the quota tool for educational purpose. Now we have mounted and started the quota system on the desired drive. You may want to add quotacheck to crontab you may do that by doing:
nano /etc/crontab
And add the following:
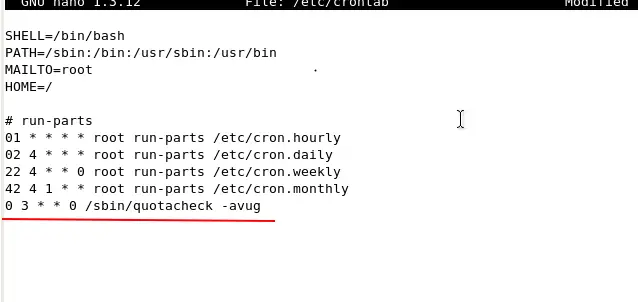
This will help to run quotacheck periodically (every week). Althought the quotacheck works periodically by itself.
Creating quota filesystem.
After each quota-enabled file system is remounted, the system is capable of working with disk quotas. < However, the file system itself is not yet ready to support quotas. The next step is to run the quotacheck command.
quotacheck -cug /your_drive
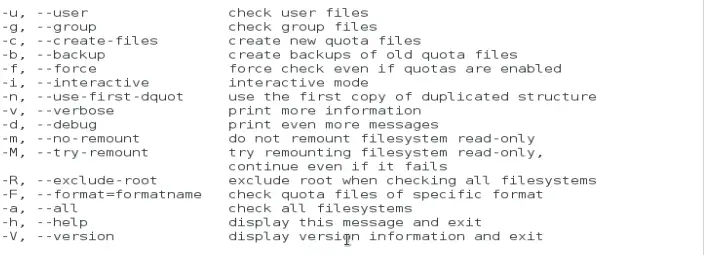
The -c option specifies that the quota files should be created for each file system with quotas enabled, the -u option specifies to check for user quotas, and the -g option specifies to check for group quotas. Using the abobe command without specifications of -u or -g will lead to the defult option of usrquota(-u). You may have a look at other options below:
Assigning quotas for particular user or group.
Before going ahead with quotas we will have to know anout the hard limit, Soft limit and Inodes which we will be loooking into further:
Soft Limit: Soft limit indicates the maximum amount of disk usage a quota user has on a partition. When combined with grace period, it acts as the border line, which a quota user is issued warnings about his impending quota violation when passed.
Hard Limit: Hard limit works only when grace period is set. It specifies the absolute limit on the disk usage, which a quota user can't go beyond his hard limit.
Grace Period:Executed with the command "edquota -t ", grace period is a time limit before the soft limit is enforced for a file system with quota enabled. Time units of sec(onds), min(utes), hour(s), day(s), week(s), and month(s) can be used.
You may have two options to assign quotas. The edquota commmand and the setquota command. Let's start with the setquota command which is a command line quota editor. The filesystem, user/group name and new quotas for this filesystem can be specified on the command line. Note that if a number is given in the place of a user/group name it is treated as an UID/GID.
		SYNOPSIS

       setquota  [  -rm  ] [ -u | -g ] [ -F quotaformat ] name block-softlimit
       block-hardlimit inode-softlimit inode-hardlimit -a | filesystem...

       setquota [ -rm ] [ -u | -g ] [ -F quotaformat ] [ -p protoname  ]  name
       -a | filesystem...

       setquota -b [ -rm ] [ -u | -g ] [ -F quotaformat ] -a | filesystem...

       setquota -t [ -u | -g ] [ -F quotaformat ] block-grace inode-grace -a |
       filesystem...

       setquota -T [ -u | -g ] [ -F quotaformat ] name block-grace inode-grace
       -a | filesystem...
You may use the command by typing:
setquota -u linux 100 200 10 15 -a /your_drive
In the above command you will be settin limit for user linux. You can see the output or effect by typing:
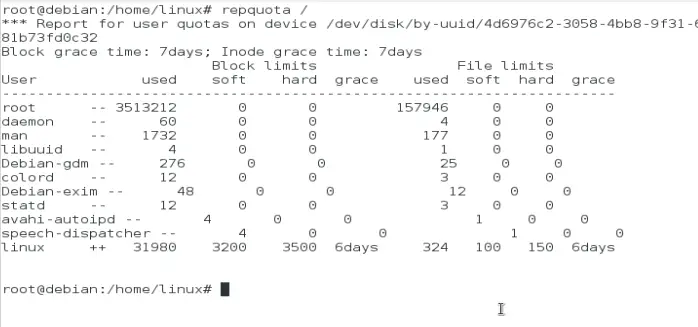
repquota /your_drive
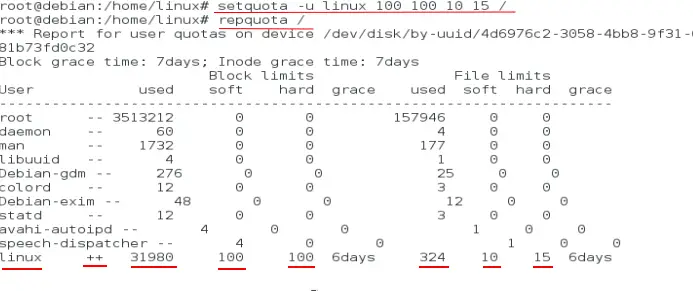
Now in the above image the user linux has already exceeded his limit both the block and the file limit indicated by the ++ sign. Because the soft and hard limit set is 100 and in has already used 31980 blocks of memory the same is the case with files. You may also want to explore more about "setquota" command you can go ahead and type:
man setquota
Starting with the edquota command. It is a is a quota editor. One or more users or groups may be speci†fied on the command line. If a number is given in the place of user/group name it is treated as an UID/GID. For each user or group a temporary file is created with an ASCII representation of the current disk quotas for that user or group and an editor is then invoked on the file. The quotas may then be modified, new quotas added, etc. Setting a quota to zero indicates that no quota should be imposed.
You may use the command by typing:
edquota username (for users)
edquota -g groupname (for groups)
The text editor defined by the EDITOR environment variable is used by edquota.

This is how it looks more or can less like. The first column is the name of the file system that has a quota enabled for it. The second column shows how many blocks the user is currently using. The next two columns are used to set soft and hard block limits for the user on the file system. The inodes column shows how many inodes the user is currently using. The last two columns are used to set the soft and hard inode limits for the user on the file system. The hard block limit is the absolute maximum amount of disk space that a user or group can use. Once this limit is reached, no further disk space can be used. The soft block limit defines the maximum amount of disk space that can be used. However, unlike the hard limit, the soft limit can be exceeded for a certain amount of time. That time is known as the grace period. The grace period can be expressed in seconds, minutes, hours, days, weeks, or months. If any of the values are set to 0, that limit is not set. In the text editor, change the desired limits. You may check the further details in the man pages:
man edquota
After this you may check the user limits for yourself:
quota username
It will show output something like:

The * mark indicated that the user has exceeded his limits. The above commands can be used for groups too:
quota -g grpname (for group)
This is all for the quota assignment. Now lets have look at few more commands.
repquota /
The above command will give you an complete status of your quotas.
quotaon -a (starting quota on all file systems.)
This is the command that announces to the system that disk quotas should be enabled on one or more filesystems. The filesystem quota files must be present in the root directory of the specified filesystem and be named either aquota.user (for version 2 user quota), quota.user (for version 1 user quota), aquota.group (for version 2 group quota), or quota.group (for version 1 group quota). The command is used by default by the system at startup.
quotaoff -a (stopping quota on all file systems.)
This command announces to the system that the specified filesystems should have any disk quotas turned off. This command is run by default on the system at the time of shutdown.
This will be the end for the quota tutotial of Linux.

