Server Monitoring with Munin and Monit on Debian 10
This tutorial exists for these OS versions
- Debian 10 (Buster)
- Debian 8 (Jessie)
- Debian 7 (Wheezy)
- Debian 6 (Squeeze)
- 0
- Debian 3.1 (Sarge)
On this page
In this article, I describe how you can monitor your Debian 10 (Buster) server with Munin and Monit. Munin generates nifty little graphs about almost every aspect of your server (load average, memory usage, CPU usage, MySQL throughput, network traffic, etc.) without much configuration, while Monit checks the availability of services like Apache, MySQL, Postfix and takes the appropriate action like a restart if it finds that a service is not behaving as expected. Combining the two gives you complete monitoring: graphs that let you see current or impending problems (e.g. "We need a bigger server soon, our load average is increasing rapidly."), and a watchdog that ensures the availability of the monitored services.
Although you can monitor more than one server with Munin, we will only discuss monitoring the system it is installed on here.
This guide was written for Debian 10 (Buster), but the configuration should also apply to other distributions like Ubuntu with minor changes.
1 Preliminary Note
All commands in this tutorial are run as root user. Log into your server as root by SSH or open a terminal window. If you log in as a different user than root, use the command
su -
to become the root user, before you proceed.
Our system's hostname is server1.example.com, and we have a website www.example.com on it with the document root /var/www/www.example.com/web.
Ensure that the system is up to date before you start to install Munin, run:
apt update
apt upgrade
Apache is used to show the Munin pages, the apache fcgid module is required for the Munin graph zoom feature. Install apache and the fcgid module with apt.
apt install apache2 libcgi-fast-perl libapache2-mod-fcgid
Enable the fcgid module in apache.
a2enmod fcgid
2 Install and Configure Munin
To install Munin on Debian, we do this:
apt install munin munin-node munin-plugins-extra
When the server is running MySQL or MariaDB, then enable the a few extra Munin plugins to monitor MySQL:
cd /etc/munin/plugins
ln -s /usr/share/munin/plugins/mysql_ mysql_
ln -s /usr/share/munin/plugins/mysql_bytes mysql_bytes
ln -s /usr/share/munin/plugins/mysql_innodb mysql_innodb
ln -s /usr/share/munin/plugins/mysql_isam_space_ mysql_isam_space_
ln -s /usr/share/munin/plugins/mysql_queries mysql_queries
ln -s /usr/share/munin/plugins/mysql_slowqueries mysql_slowqueries
ln -s /usr/share/munin/plugins/mysql_threads mysql_threads
Next, we must edit the Munin configuration file /etc/munin/munin.conf. Uncomment the dbdir, htmldir, logdir, rundir, and tmpldir lines (the default values are fine). We want Munin to use the name server1.example.com instead of localhost.localdomain in the HTML output, therefore we replace localhost.localdomain with server1.example.com in the simple host tree section. Without the comments, the changed file looks like this:
nano /etc/munin/munin.conf
# Example configuration file for Munin, generated by 'make build'

# The next three variables specifies where the location of the RRD
# databases, the HTML output, logs and the lock/pid files. They all
# must be writable by the user running munin-cron. They are all
# defaulted to the values you see here.
#
dbdir /var/lib/munin
htmldir /var/cache/munin/www
logdir /var/log/munin
rundir /var/run/munin

# Where to look for the HTML templates
#
tmpldir /etc/munin/templates

# Where to look for the static www files
#
#staticdir /etc/munin/static

# temporary cgi files are here. note that it has to be writable by
# the cgi user (usually nobody or httpd).
#
# cgitmpdir /var/lib/munin/cgi-tmp

# (Exactly one) directory to include all files from.
includedir /etc/munin/munin-conf.d
[...]
# a simple host tree
[server1.example.com]
 address 127.0.0.1
 use_node_name yes
[...]
We should find the Apache 2.4 configuration file for Munin /etc/munin/apache24.conf - it defines an alias called munin to Munin's HTML output directory /var/cache/munin/www which means we can access munin from all websites on this server by using the relative path /munin (e.g. http://www.example.com/munin).
The apache Munin configuration is not enabled by default, this has been changed from DebianWheezy to Jessie. The new config directory is /etc/apache2/conf-enabled instead of /etc/apache2/conf.d which was used in older versions like Wheezy and Squeeze.
Run these commands to enable and load the configuration into apache.
cd /etc/apache2/conf-enabled/
ln -s /etc/munin/apache24.conf munin.conf
service apache2 restart
Make sure you comment out the line Require local and add Require all granted and Options FollowSymLinks SymLinksIfOwnerMatch instead (otherwise you will only be able to access the Munin output from localhost):
nano /etc/munin/apache24.conf
Alias /munin /var/cache/munin/www
<Directory /var/cache/munin/www>
 # Require local
 Require all granted
 Options FollowSymLinks SymLinksIfOwnerMatch
</Directory>

ScriptAlias /munin-cgi/munin-cgi-graph /usr/lib/munin/cgi/munin-cgi-graph
<Location /munin-cgi/munin-cgi-graph>
 # Require local
 Require all granted
 Options FollowSymLinks SymLinksIfOwnerMatch
 <IfModule mod_fcgid.c>
 SetHandler fcgid-script
 </IfModule>
 <IfModule !mod_fcgid.c>
 SetHandler cgi-script
 </IfModule>
</Location>
Restart Apache:
systemctl restart apache2.service
Then restart Munin:
systemctl restart munin-node.service
Now wait a few minutes so that Munin can produce its first output, and then go to http://www.example.com/munin/ in your browser, and you see the first statistics:
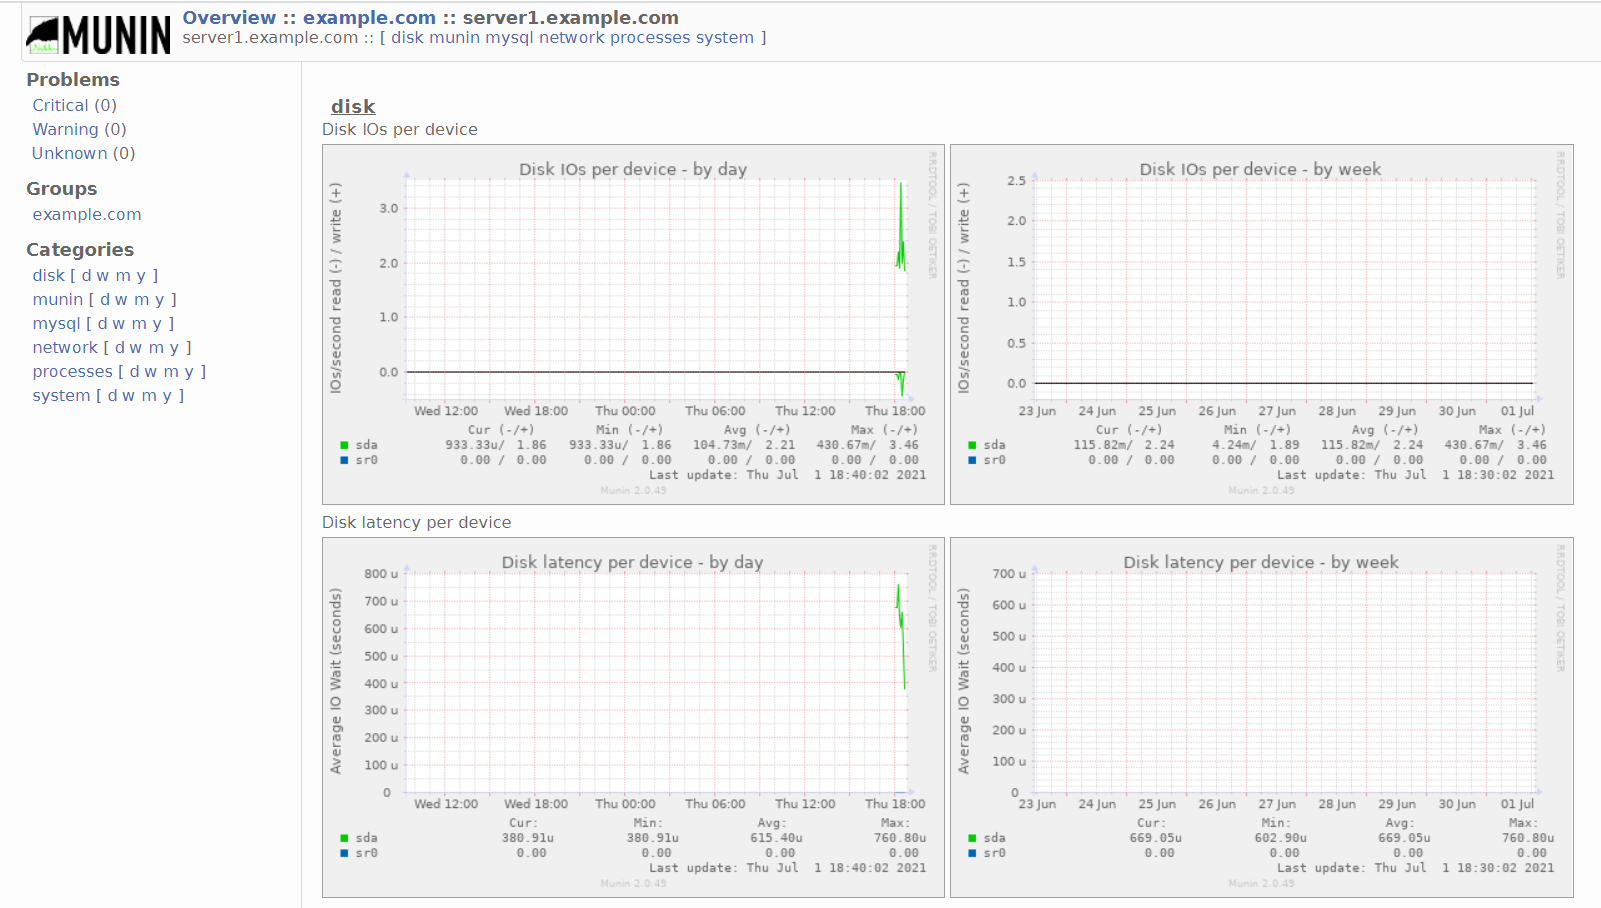
(This is just a small excerpt of the many graphics that munin produces...)
3 Password-Protect the Munin Output Directory (Optional but highly recommended)
Now it is a good idea to password-protect the munin output directory unless you want everybody to be able to see every little statistic about your server.
To do this, we must create the password file /etc/munin/munin-htpasswd. We want to login with the username admin, so we do this:
htpasswd -c /etc/munin/munin-htpasswd admin
Enter a password for admin. Then open /etc/munin/apache24.conf again...
nano /etc/munin/apache24.conf
... comment out "Require all granted and add the lines that I marked in red:
Alias /munin /var/cache/munin/www
<Directory /var/cache/munin/www>
 # Require local
 # Require all granted
 AuthUserFile /etc/munin/munin-htpasswd
 AuthName "Munin"
 AuthType Basic
 Require valid-user
 Options None
</Directory>

ScriptAlias /munin-cgi/munin-cgi-graph /usr/lib/munin/cgi/munin-cgi-graph
<Location /munin-cgi/munin-cgi-graph>
 # Require local
 # Require all granted
 AuthUserFile /etc/munin/munin-htpasswd
 AuthName "Munin"
 AuthType Basic
 Require valid-user
 <IfModule mod_fcgid.c>
 SetHandler fcgid-script
 </IfModule>
 <IfModule !mod_fcgid.c>
 SetHandler cgi-script
 </IfModule>
</Location>
Then restart Apache:
systemctl restart apache2.service
4 Enable additional modules in Munin
The Munin command "munin-node-configure --suggest" can be used to get recommendations for additional Munin modules that can be enabled on the server. Run:
munin-node-configure --suggest
The output should be similar to this:
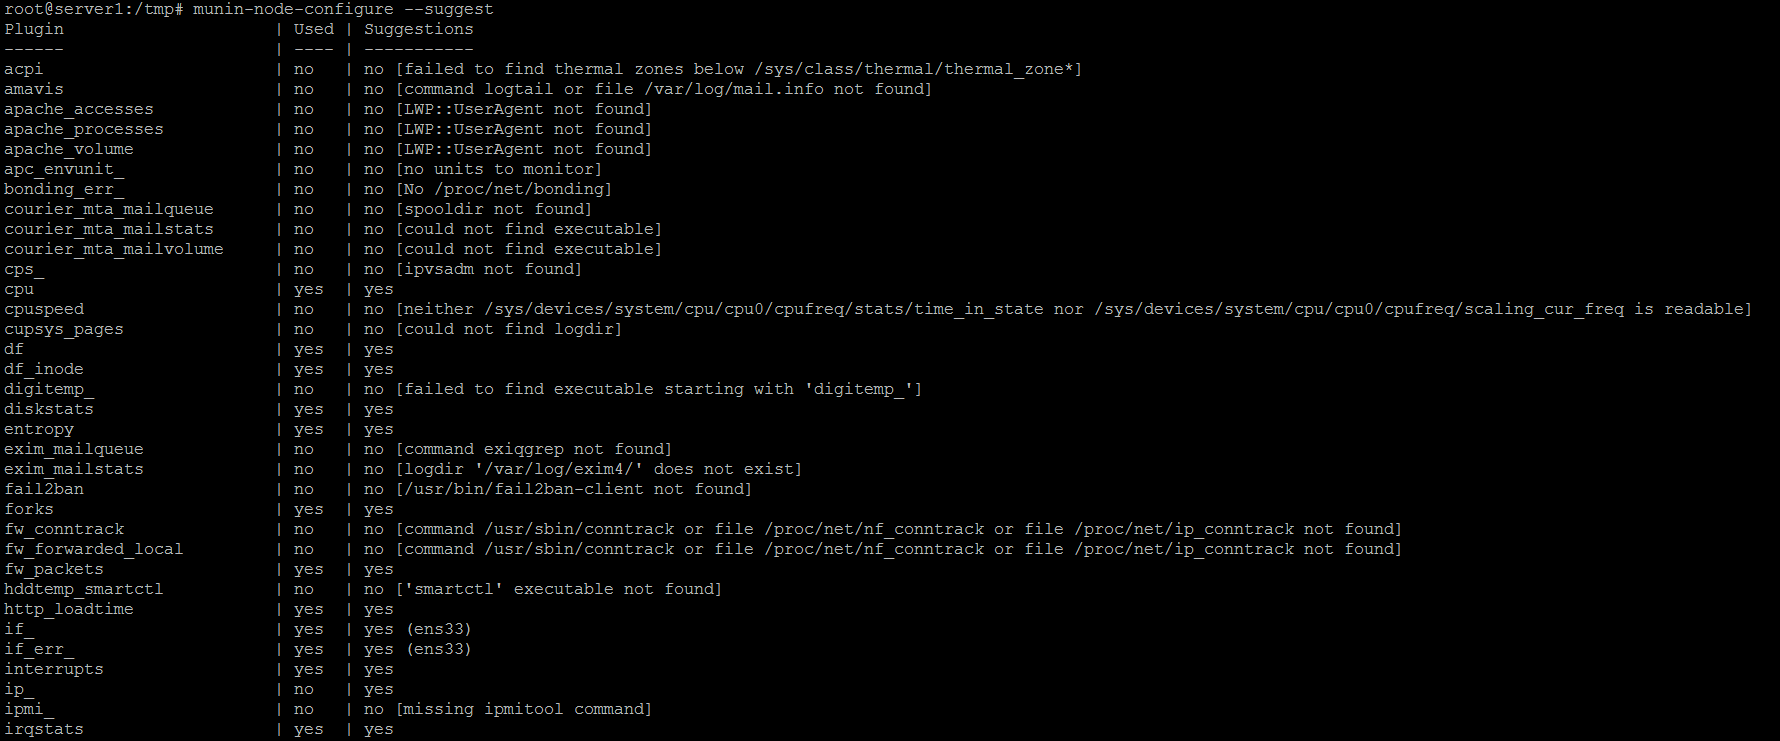
The column "used" shows if a module is enabled, the column "Suggestions" shows if the server runs a service that can be monitored by this module. Create a symlink for the module in /etc/munin/plugins to enable it.
Here I will enable the apache_* modules for example:
cd /etc/munin/plugins
ln -s /usr/share/munin/plugins/apache_accesses
ln -s /usr/share/munin/plugins/apache_processes
ln -s /usr/share/munin/plugins/apache_volume
Restart Munin to load the new configuration.
systemctl restart munin-node.service
5 Install and Configure Monit
Monit is available from Debian Buster backports repository. This repository is not enabled by default, so we have to add it first. Run this command:
echo 'deb http://ftp.de.debian.org/debian buster-backports main' > /etc/apt/sources.list.d/buster-backports.list
and then update package lists with:
apt update
To install Monit, we do this:
apt install monit
Now we must edit /etc/monit/monitrc. The default /etc/monit/monitrc has lots of examples, and you can find more configuration examples on http://mmonit.com/monit/documentation/. However, in my case I want to monitor proftpd, sshd, mysql, apache, and postfix, I want to enable the Monit web interface on port 2812, I want a https web interface, I want to login to the web interface with the username admin and the password howtoforge, and I want Monit to send email alerts to root@localhost, so my file looks like this (I've added examples for other daemons to the configuration so that you can adjust the file to your needs):
cp /etc/monit/monitrc /etc/monit/monitrc_orig
cat /dev/null > /etc/monit/monitrc
nano /etc/monit/monitrc
set daemon 60
set logfile syslog facility log_daemon
set mailserver localhost
set mail-format { from: [email protected] }
set alert root@localhost
set httpd port 2812 and
 SSL ENABLE
 PEMFILE /var/certs/monit.pem
 allow admin:howtoforge

check process sshd with pidfile /var/run/sshd.pid
 start program "/usr/sbin/service ssh start"
 stop program "/usr/sbin/service ssh stop"
 if failed port 22 protocol ssh then restart
 if 5 restarts within 5 cycles then timeout

check process apache with pidfile /var/run/apache2/apache2.pid
 group www
 start program = "/usr/sbin/service apache2 start"
 stop program = "/usr/sbin/service apache2 stop"
 if failed host localhost port 80 protocol http
 and request "/monit/token" then restart
 if cpu is greater than 60% for 2 cycles then alert
 if cpu > 80% for 5 cycles then restart
 if totalmem > 500 MB for 5 cycles then restart
 if children > 250 then restart
 if loadavg(5min) greater than 10 for 8 cycles then stop
 if 3 restarts within 5 cycles then timeout

# ---------------------------------------------------------------------------------------------
# NOTE: Replace example.pid with the pid name of your server, the name depends on the hostname
# ---------------------------------------------------------------------------------------------
#check process mysql with pidfile /var/lib/mysql/example.pid
# group database
# start program = "/usr/sbin/service mysql start"
# stop program = "/usr/sbin/service mysql stop"
# if failed host 127.0.0.1 port 3306 then restart
# if 5 restarts within 5 cycles then timeout

#check process proftpd with pidfile /var/run/proftpd.pid
# start program = "/usr/sbin/service proftpd start"
# stop program = "/usr/sbin/service proftpd stop"
# if failed port 21 protocol ftp then restart
# if 5 restarts within 5 cycles then timeout
#
#check process postfix with pidfile /var/spool/postfix/pid/master.pid
# group mail
# start program = "/usr/sbin/service postfix start"
# stop program = "/usr/sbin/service postfix stop"
# if failed port 25 protocol smtp then restart
# if 5 restarts within 5 cycles then timeout
#
#check process nginx with pidfile /var/run/nginx.pid
# start program = "/usr/sbin/service nginx start"
# stop program = "/usr/sbin/service nginx stop"
# if failed host 127.0.0.1 port 80 then restart
#
#check process memcached with pidfile /var/run/memcached.pid
# start program = "/usr/sbin/service memcached start"
# stop program = "/usr/sbin/service memcached stop"
# if failed host 127.0.0.1 port 11211 then restart
#
#check process pureftpd with pidfile /var/run/pure-ftpd/pure-ftpd.pid
# start program = "/usr/sbin/service pure-ftpd-mysql start"
# stop program = "/usr/sbin/service pure-ftpd-mysql stop"
# if failed port 21 protocol ftp then restart
# if 5 restarts within 5 cycles then timeout
#
#check process named with pidfile /var/run/named/named.pid
# start program = "/usr/sbin/service bind9 start"
# stop program = "/usr/sbin/service bind9 stop"
# if failed host 127.0.0.1 port 53 type tcp protocol dns then restart
# if failed host 127.0.0.1 port 53 type udp protocol dns then restart
# if 5 restarts within 5 cycles then timeout
#
#check process ntpd with pidfile /var/run/ntpd.pid
# start program = "/usr/sbin/service ntp start"
# stop program = "/usr/sbin/service ntp stop"
# if failed host 127.0.0.1 port 123 type udp then restart
# if 5 restarts within 5 cycles then timeout
#
#check process mailman with pidfile /var/run/mailman/mailman.pid
# group mail
# start program = "/usr/sbin/service mailman start"
# stop program = "/usr/sbin/service mailman stop"
#
#check process amavisd with pidfile /var/run/amavis/amavisd.pid
# group mail
# start program = "/usr/sbin/service amavis start"
# stop program = "/usr/sbin/service amavis stop"
# if failed port 10024 protocol smtp then restart
# if 5 restarts within 5 cycles then timeout
#
#check process courier-imap with pidfile /var/run/courier/imapd.pid
# group mail
# start program = "/usr/sbin/service courier-imap start"
# stop program = "/usr/sbin/service courier-imap stop"
# if failed host localhost port 143 type tcp protocol imap then restart
# if 5 restarts within 5 cycles then timeout
#
#check process courier-imap-ssl with pidfile /var/run/courier/imapd-ssl.pid
# group mail
# start program = "/usr/sbin/service courier-imap-ssl start"
# stop program = "/usr/sbin/service courier-imap-ssl stop"
# if failed host localhost port 993 type tcpssl sslauto protocol imap then restart
# if 5 restarts within 5 cycles then timeout
#
#check process courier-pop3 with pidfile /var/run/courier/pop3d.pid
# group mail
# start program = "/usr/sbin/service courier-pop start"
# stop program = "/usr/sbin/service courier-pop stop"
# if failed host localhost port 110 type tcp protocol pop then restart
# if 5 restarts within 5 cycles then timeout
#
#check process courier-pop3-ssl with pidfile /var/run/courier/pop3d-ssl.pid
# group mail
# start program = "/usr/sbin/service courier-pop-ssl start"
# stop program = "/usr/sbin/service courier-pop-ssl stop"
# if failed host localhost port 995 type tcpssl sslauto protocol pop then restart
# if 5 restarts within 5 cycles then timeout
#
#check process dovecot with pidfile /var/run/dovecot/master.pid
# group mail
# start program = "/usr/sbin/service dovecot start"
# stop program = "/usr/sbin/service dovecot stop"
# if failed host localhost port 993 type tcpssl sslauto protocol imap then restart
# if 5 restarts within 5 cycles then timeout
The configuration file is pretty self-explaining; if you are unsure about an option, take a look at the Monit documentation: http://mmonit.com/monit/documentation/monit.html
In the apache part of the Monit configuration you find this:
   if failed host localhost port 80 protocol http
      and request "/monit/token" then restart
which means that Monit tries to connect to localhost on port 80 and tries to access the file /monit/token which is /var/www/html/monit/token because our web site's document root is /var/www/html. If Monit doesn't succeed it means Apache isn't running, and Monit is going to restart it. Now we must create the file /var/www/html/monit/token and write some random string into it:
mkdir /var/www/html/monit
echo "hello" > /var/www/html/monit/token
Next we create the pem cert (/var/certs/monit.pem) we need for the SSL-encrypted Monit web interface:
mkdir /var/certs
cd /var/certs
We need an OpenSSL configuration file to create our certificate. It can look like this:
nano /var/certs/monit.cnf
# create RSA certs - Server

[ req ]
default_bits = 2048
encrypt_key = yes
distinguished_name = req_dn
x509_extensions = cert_type

[ req_dn ]
countryName = Country Name (2 letter code)
countryName_default = MO

stateOrProvinceName             = State or Province Name (full name)
stateOrProvinceName_default     = Monitoria

localityName                    = Locality Name (eg, city)
localityName_default            = Monittown

organizationName                = Organization Name (eg, company)
organizationName_default        = Monit Inc.

organizationalUnitName          = Organizational Unit Name (eg, section)
organizationalUnitName_default  = Dept. of Monitoring Technologies

commonName                      = Common Name (FQDN of your server)
commonName_default              = server.monit.mo

emailAddress                    = Email Address
emailAddress_default            = [email protected]

[ cert_type ]
nsCertType = server
Now we create the certificate like this:
openssl req -new -x509 -days 365 -nodes -config ./monit.cnf -out /var/certs/monit.pem -keyout /var/certs/monit.pem
openssl dhparam 2048 >> /var/certs/monit.pem
openssl x509 -subject -dates -fingerprint -noout -in /var/certs/monit.pem
chmod 600 /var/certs/monit.pem
Finally, we can start Monit:
service monit restart
Now point your browser to https://www.example.com:2812/ (make sure port 2812 isn't blocked by your firewall), log in with admin and howtoforge, and you should see the Monit web interface. It should look like this:
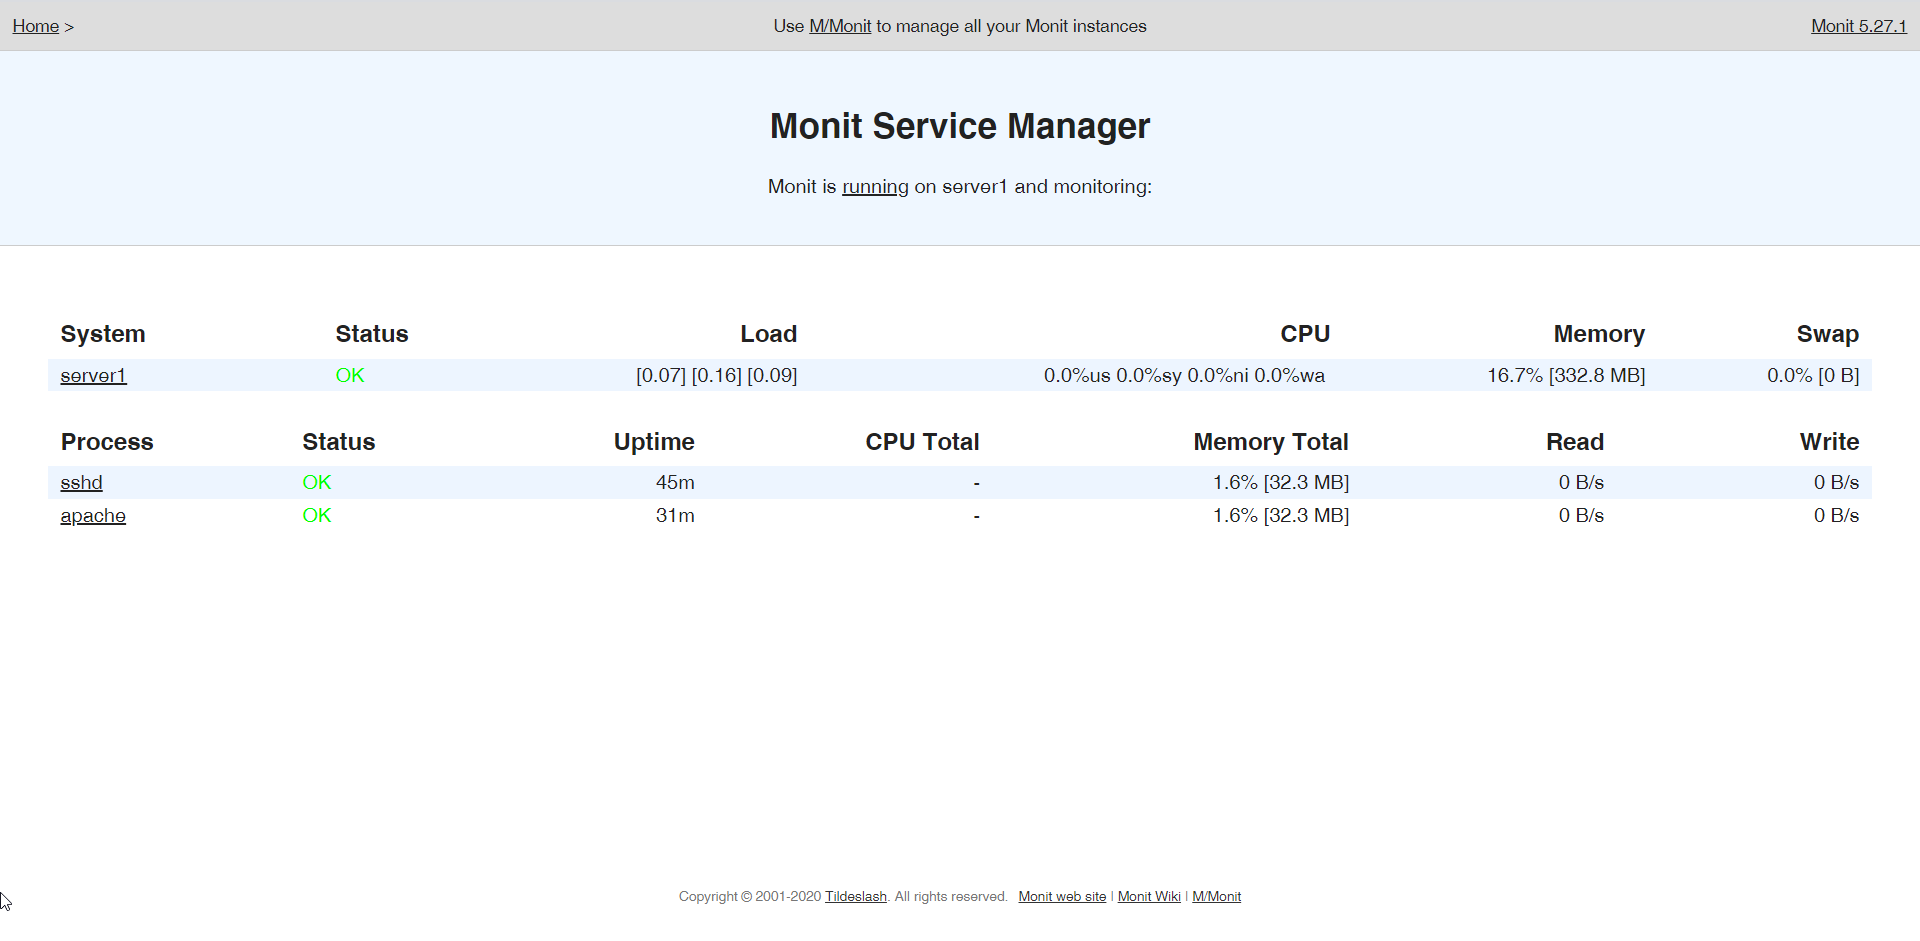
(Main Screen)
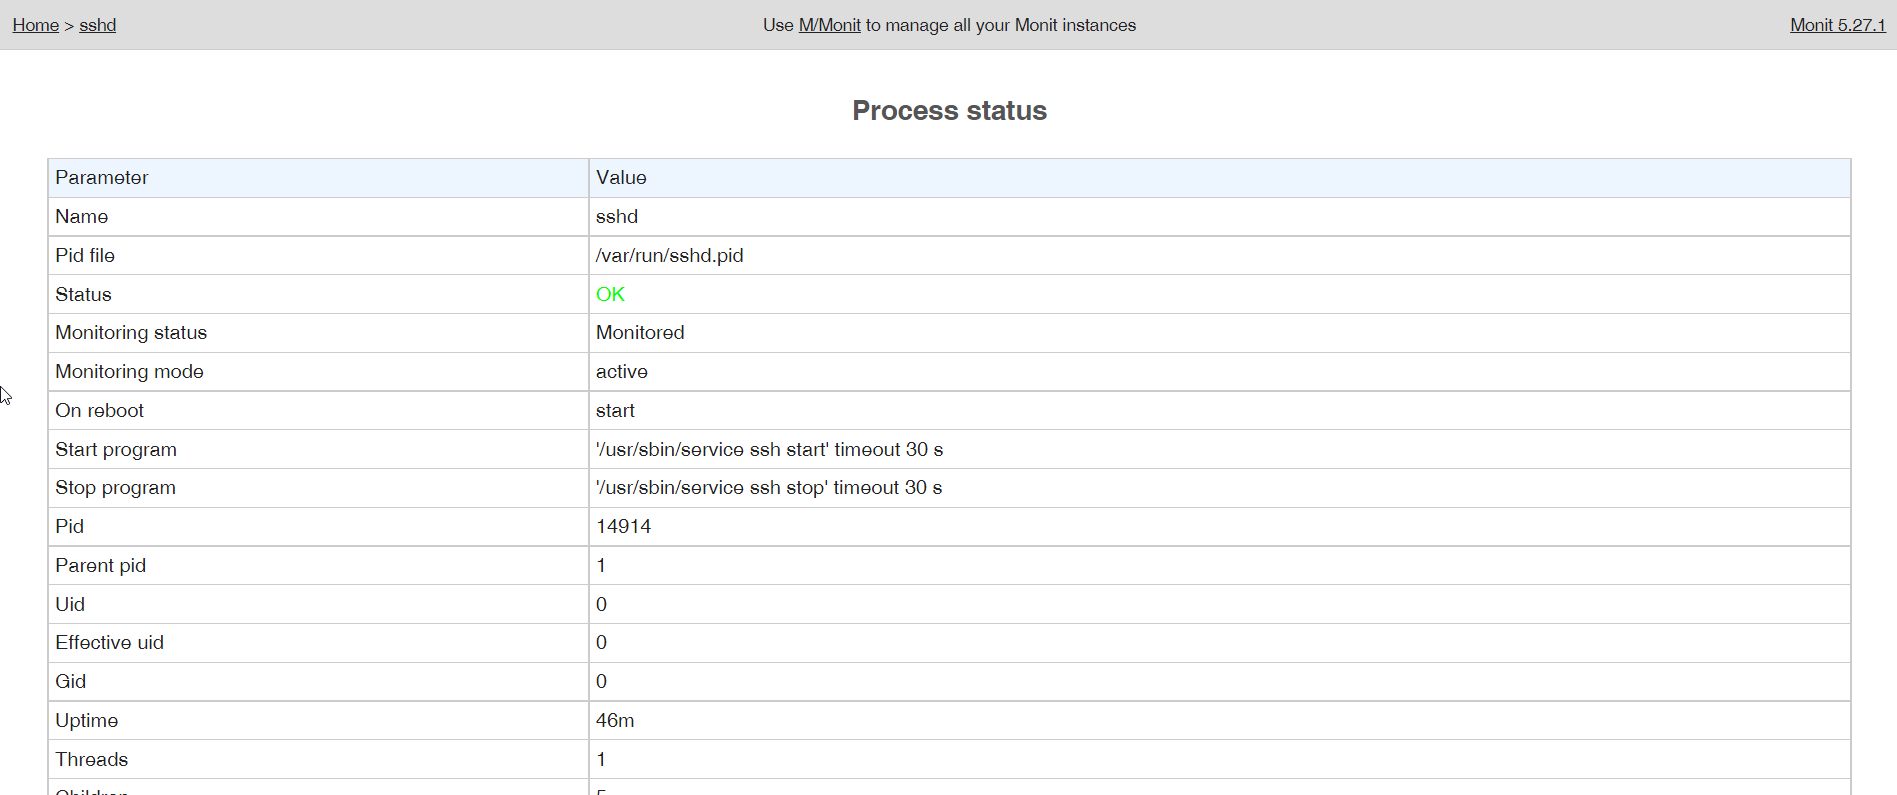

(SSHd Status Page)
Depending on your configuration in /etc/monit/monitrc monit will restart your services if they fail and send notification emails if process IDs of services change, etc.
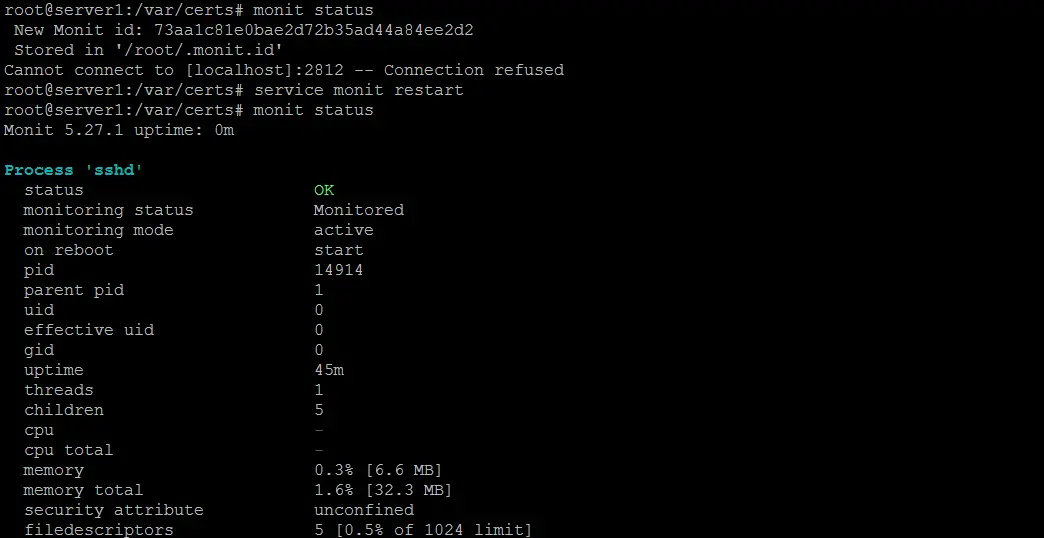
To get the Monit status on the shell, run the "monit status" command:
monit status
The command will show the status of all monitored services.
6 Links
- munin: http://munin-monitoring.org/
- monit: http://mmonit.com/monit/

