How to Detect Network Devices with Python on Linux
Sometimes you might have network or firewall issues in an internal that require a network scan to find which IP addresses are in use. For that purpose, we can use ready-made tools such as nmap, zmap or angryIP. But if we have no internet access to download these tools we can do the scan by only using manual commands. However, the manual scanning can be quite tedious, with the understanding that should be done for each IP address given on our network.
Taking the above into account, I'll show in this tutorial how we can automate this task by using Python, knowing that python is available on almost all Linux distros available in the market.
Python is the perfect choice for this because it allows us to automate every task the OS can execute, we just have to use correct libraries.
Using Linux Libraries in Python
The focus of our current study is the ping sweep command, to detect all connected and turned-on equipment on our network. The script we are building makes a ping to each IP address on the network. For example we use the subnet mask / 24, it will loop only trough the first 3 octets of the IP. The first thing we have to consider for this script is which system libraries can be used for the task, we have to import the sys and subprocess libraries. These libraries allow the use of specific commands of the python interpreter and the operating system itself, in this case Scientific Linux 7.1.
import sys, subprocess
I will save my script under the name networkmonitor.py.
Detecting the right Argument
When we run the script by using the command
>>python networkmonitor.py 10.0.0.
on the shell, if the argument on the command is wrong (if len(sys.argv)<>2:), the script will display a correct example. (print "networkmonitor.py 10.0.0.").
The argument is the IP address of the scanned subnet, only the first 3 octets are used. So if the argument is correct, then the result of the command "ping -c1 "+sys.argv[1] will be stored in a variable, in our case is cmdping, sys.argv[1] is the "argument" variable in sys module and will store the first argument given to the script. In UNIX environments we have to use ping -c1 because ping command would run infinitely.
if len(sys.argv)<>2:
    print "networkmonitor 10.0.0."
Subprocess Command, its arguments and the for loop
On the next line starts the for loop, which is executed until it reaches the limit (stop condition) that we set for it, the condition is the IP range we want to scan. At this point, it is important to consider the time that the script needs to scan the range, the larger the range the longer the script will run. The subprocess.Popen allows us to launch a shell command and wait until it finishes. Once completed, we check the state that the command returned. The cmdping+str(x), executed by the subprocess.Popen, increases the index for the IP given by the argument on each cycle of the for loop.
The shell=true means that the process will be executed on the shell. However, Python documents website warns about the hazard of using shell=true, so be careful which command you execute. The subprocess.PIPE using as stderr argument indicates that Python shall open a pipe to the standard stream.
for x in range(99,110):
        p = subprocess.Popen(cmdping+str(x), shell=True, stderr=subprocess.PIPE)
In this case, we only tested eleven IP Addresses (from 99 to 110).
Now we have to check the content of stderr, we will stop (break) when the variable is empty, otherwise we show the stdout content.
out = p.stderr.read(1)
            if out == '' and p.poll() != None:
                break
            if out != '':
                sys.stdout.write(out)
                sys.stdout.flush()
This last code must run if shell remains on true state.
The Complete code is now:
import sys, subprocess
if len(sys.argv)<>2:
    print "networkmonitor 10.0.0."
else:
    cmdping ="ping -c1 "+sys.argv[1]
    for x in range(99,110):
        p = subprocess.Popen(cmdping+str(x), shell=True, stderr=subprocess.PIPE)
        while True:
            out = p.stderr.read(1)
            if out == '' and p.poll() != None:
                break
            if out != '':
                sys.stdout.write(out)
                sys.stdout.flush()
The Output of our small script is:
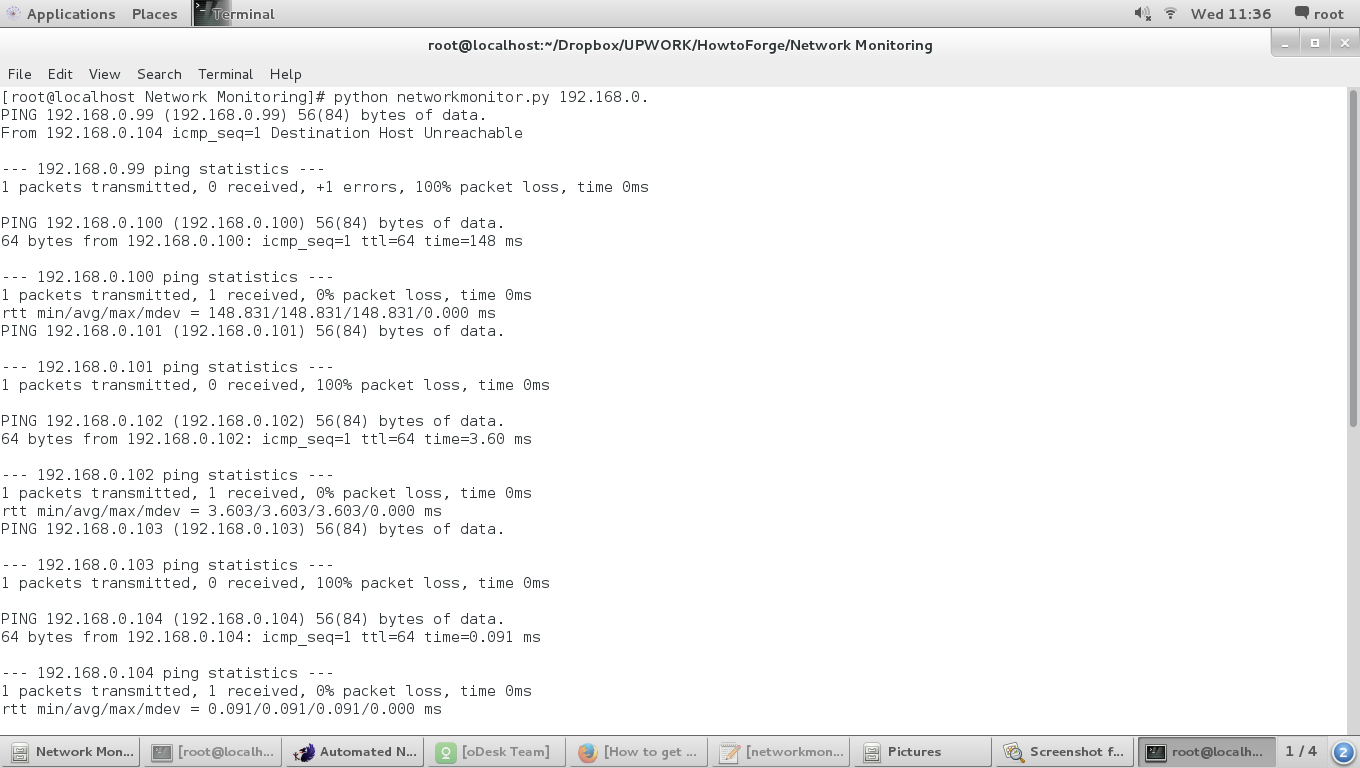
As shown in the screenshot, the tool only makes a ping to get a positive or negative answer and then moves to the next IP address, and so on to analyze the entire address range.
It should be mentioned that I don't claim authorship of the above-analyzed code. I'm just explaining its functionality step by step to get a better understanding of system commands and network functions. I'll give credit to the author.

