How to install Ioncube Loader on CentOS, Debian and Ubuntu
The Ioncube loader is a PHP module to load files that were protected with the Ioncube Encoder software. Ioncube is often used by commercial PHP software vendors to protect their software, so it is likely that you come across an Ioncube encoded file sooner or later when you install extensions for CMS or Shop software written in PHP. In this tutorial, I will explain the installation of the Ioncube loader module in detail for CentOS, Debian, and Ubuntu.
1 Prerequisites
Your server must have the PHP programming language installed. I will use the command line Editor Nano and the command line download application wget. Nano and Wget are installed on most servers, in case they are missing on your server then install them with apt / yum:
CentOS
yum install nano wget
Debian and Ubuntu
apt-get install nano wget
2 Download Ioncube Loader
The Ioncube loader files can be downloaded free of charge from Ioncube Inc. They exist for 32Bit and 64Bit Linux systems.
In the first step, I will check if the server is a 32Bit or 64Bit system. Run:
uname -a
The output will be similar to this:

When the text contains "x86_64" then the server runs a 64Bit Linux Kerbel. Otherwise, it's a 32Bit (i386) Kernel. Most current Linux servers run a 64Bit Kernel.
Download the Loader in tar.gz format to the /tmp folder and unpack it:
For 64Bit x86_64 Linux:
cd /tmp
wget http://downloads3.ioncube.com/loader_downloads/ioncube_loaders_lin_x86-64.tar.gz
tar xfz ioncube_loaders_lin_x86-64.tar.gz
For 32Bit i386 Linux:
cd /tmp
wget http://downloads3.ioncube.com/loader_downloads/ioncube_loaders_lin_x86.tar.gz
tar xfz ioncube_loaders_lin_x86.tar.gz
The files get unpacked into a folder with the name "ioncube".
3 Which Ioncube Loader is the right one?
When you run "ls /tmp/ioncube" then you see that there are many loader files in the ioncube directory.

The files have a number that corresponds with the PHP version they are made for and there is also a "_ts" (Thread Safe) version of each loader. We will use the version without thread safety here.
To find out the installed php version, run the command:
php -v
The output will be similar to this:

For this task, only the first two digits of the version number in the first result line matter, on this server I'll run PHP 7.0. We note this number as we need it for the next steps.
Now it's time to find out where the extension directory of this PHP version is, run the following command to find the directory name:
php -i | grep extension_dir
The output should be similar to the one from this screenshot:
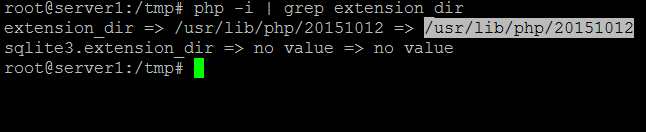
I marked the path in the screenshot, the extension directory on this server is "/usr/lib/php/20151012". The directory name will be different for each PHP version and Linux distribution, just use the one you get from the command and not the one that I got here.
No well copy the ioncube loader for our PHP version 7.0 to the extension directory /usr/lib/php/20151012:
cp /tmp/ioncube/ioncube_loader_lin_7.0.so /usr/lib/php/20151012/
Replace "7.0" in the above with your PHP version and "/usr/lib/php/20151012" with the extension directory of your PHP version.
4 Configure PHP for the Ioncube Loader
The next configuration step is a bit different for Centos and Debian/Ubuntu. We will have to add a line:
zend_extension = /usr/lib/php/20151012/ioncube_loader_lin_7.0.so
as first line into the php.ini file(s) of the system. Again, the above path contains the extension directory "/usr/lib/php/20151012" and the PHP version "7.0", ensure that you replace them to match your system setup. I'll start with the instructions for CentOS.
4.1 Configure Ioncube loader on CentOS
Centos has just one central php.ini file where we have to add the ioncube loader to. Open the file /etc/php.ini with an editor:
nano /etc/php.ini
and add "zend_extension =" plus the path to the ioncube loader as the first line in the file.
zend_extension = /usr/lib/php/20151012/ioncube_loader_lin_7.0.so
Then save the file and restart the Apache web server:
service httpd restart
service php-fpm restart
4.2 Configure Ioncube loader on Debian and Ubuntu
Debian and Ubuntu use separate php.ini files for PHP CLI (Commandline), CGI, Apache2 and FPM mode. The file paths are:
- /etc/php/7.0/apache2/php.ini
- /etc/php/7.0/cli/php.ini
- /etc/php/7.0/cgi/php.ini
- /etc/php/7.0/fpm/php.ini
A file has to be edited to enable the ioncube loader into the corresponding PHP mode. You are free to leave out files for PHP modes that you don't use or where you don't need ioncube loader support. It is also possible that you don't have all files on your server, so don't worry when you can't find one of the files.
Apache mod_php
nano /etc/php/7.0/apache2/php.ini
Command line PHP (CLI)
nano /etc/php/7.0/cli/php.ini
PHP CGI (used for CGI and Fast_CGI modes)
nano /etc/php/7.0/cgi/php.ini
PHP FPM
nano /etc/php/7.0/fpm/php.ini
and add "zend_extension =" plus the path to the ioncube loader as the first line in the file(s).
zend_extension = /usr/lib/php/20151012/ioncube_loader_lin_7.0.so
Then save the file(s) and restart the Apache web server and php-fpm:
service apache2 restart
service php7.0-fpm restart
5 Test Ioncube
Let's check if ioncube loader has been installed successfully. First I will test the command line PHP. Run:
php -v

I marked the line in white that shows that the ioncube loader has been enabled:
with the ionCube PHP Loader (enabled) + Intrusion Protection from ioncube24.com (unconfigured) v10.2.0, Copyright (c) 2002-2018, by ionCube Ltd.
If you like to test the PHP of a website, create an "info.php file with this content:
<?php
phpinfo();
?>
And open the URL in a web browser. You will be able to see ioncube in the phpinfo() output:


