 In this tutorial we are going to provide you with step-by-step instructions on how to install Citadel on a CentOS 7 VPS. Citadel is an open source messaging and collaboration platform. Citadel has lot of useful features, such as managing emails, calendars, scheduling, instant messaging and other collaboration tools.
This install guide assumes that a web server is already installed and configured on your virtual server, so make sure to use a different port for the WebCit front end. At the time of writing this tutorial, the latest stable version of Citadel is 9.01.
Update your operating system packages, then install the ‘Development Tools’ using the following commands:
yum clean all
yum update
yum groupinstall "Development Tools"
The ‘Development tools’ are a yum group, which is a predefined bundle of software (GCC, C/C++ compilers, make etc.) that can be installed on your virtual server at once, instead of having to install each application separately. The Development tools are mainly used to allow a user build and compile software from source code etc.
In order to finish the installation successfully, Citadel requires some additional packages such as WebCit front end, Berkeley DB, libical, libSieve etc., so run the following command to install them:
yum install gettext openssl-devel shared-mime-info which
Start the installation process:
cd /opt/
/usr/bin/wget -q -O - http://easyinstall.citadel.org/install | sh
Citadel installation will automatically download and install all required dependencies. Once this process is complete, follow the easy steps:
enter the name and password of the administrator user account

set user ID to 'citadel'

enter '0.0.0.0' as IP address which the server should be listening to

set the TCP port number to '504'

choose 'internal' as user authentication mode

set WebCit to automatically start on boot

set the locale WebCit should use (e.g. en_US)

set WebCit to listen on port 2000 for HTTP requests

set WebCit to listen on port 2443 for HTTPS requests
Install SpamAssassin:
yum install spamassassin
Edit the ‘local.cf’ configuration file and set SpamAssassin to rewrite the subject of spam emails:
vi /etc/mail/spamassassin/local.cf
rewrite_header Subject [SPAM]
Enable SpamAssassin to automatically start on boot and start the SpamAssassin service:
systemctl enable spamassassin
systemctl start spamassassin
Update SpamAssassin rules using the following command:
sa-update --nogpg
ClamAV is available on EPEL repository, so install the EPEL package using the following command:
yum install epel-release
Install ClamAV, configure it and update the virus definitions:
yum install clamav clamav-update
sed -i -e "s/^Example/#Example/" /etc/freshclam.conf
freshclam
That is it. The Citadel installation is complete.
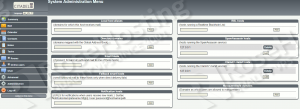
Open https://yourdomain.com:2443 using your favorite web browser, log in using the newly created administrator user account login credentials and start configuring Citadel:
Go to ‘Administration’ >> ‘Domain names and Internet mail configuration’ >> ‘SpamAssassin hosts’ and enter ‘127.0.0.1’ as the IP address of your SpamAssassin server.
On the same page, enter ‘127.0.0.1’ to the ‘ClamAV server clamd hosts’ field as the IP address of ClamAV server.
Of course you don’t have to do any of this if you use one of our Linux VPS Hosting services, in which case you can simply ask our expert Linux admins to install Citadel collaboration suite with SpamAssassin and ClamAV for you. They are available 24×7 and will take care of your request immediately.
PS. If you liked this post please share it with your friends on the social networks using the buttons on the left or simply leave a reply below. Thanks.