How to Install Nginx with ModSecurity on Ubuntu 15.04
This tutorial exists for these OS versions
- Ubuntu 22.04 (Jammy Jellyfish)
- Ubuntu 16.04 (Xenial Xerus)
- Ubuntu 15.04 (Vivid Vervet)
On this page
ModSecurity is an open-source Web Application Firewall (WAF) for Apache Nginx and IIS web server. This application layer firewall is developed by Trustwave's SpiderLabs and released under Apache License 2.0. ModSecurity protects websites from hackers by using a set of regular expression rules to filter out commonly known exploits, it allows HTTP traffic monitoring, logging, real-time analysis, and attack detection. There are more than 16.000 rule available to detect attacks like SQL Injection, Cross-site Scripting (XSS), Local File Inclusion, Remote File Inclusion and application-specific rules for many web applications like Wordpress, Joomla, Drupal etc.
In this tutorial, I will show you how to install mod_security for the fast Nginx web server. I will configure ModSecurity as a standalone module and then build Nginx from source to include ModSecurity.
Prerequisites
- An Ubuntu 15.04 server, I will use the IP here 192.168.1.106.
- Root Privileges
What we will do in this tutorial:
- Update the Ubuntu 15.04 System and Repository.
- Install required Dependencies to build Nginx and ModSecurity.
- Download ModSecurity and Nginx.
- Install ModSecurity and Nginx.
- Configure Nginx.
- Configure ModSecurity.
- Configure OWASP Core Rule Set(CRS).
- Testing.
All commands below have to be executed as root. Run:
sudo -i
to become root user on your server.
1. Update System and Repository
Before you start to install all dependencies, please update your system:
apt-get update
apt-get upgrade
2. Install the build dependencies
Install all packages that are required to compile Nginx and ModSecurity with apt command below:
apt-get install git build-essential libpcre3 libpcre3-dev libssl-dev libtool autoconf apache2-prefork-dev libxml2-dev libcurl4-openssl-dev
3. Download ModSecurity and Nginx
Go to directory "/usr/src/", then clone the ModSecurity repository from Github:
cd /usr/src/
git clone https://github.com/SpiderLabs/ModSecurity.git modsecurity
Download Nginx with the wget command, I will use the Nginx stable version 1.8 here. If you want to use another version, please go to Nginx download page to get a list of all available releases.
wget http://nginx.org/download/nginx-1.8.0.tar.gz
4. Install ModSecurity and Nginx
Now it's time to install ModSecurity, please go to the /usr/src/modsecurity directory:
cd /usr/src/modsecurity/
And compile ModSecurity as standalone module on your server, so we can include it to the Nginx:
./autogen.sh
./configure --enable-standalone-module --disable-mlogc
make
Now go to the nginx directory, compile Nginx and include ModSecurity module:
cd ../nginx-1.8.0
./configure \
  --user=www-data \
  --group=www-data \
  --with-debug \
  --with-ipv6 \
  --with-http_ssl_module \
  --add-module=/usr/src/modsecurity/nginx/modsecurity
The configure command explained:
Nginx will run under user and group "www-data", and we activate the debug, ipv6 and ssl modules. And finally we include the ModSecurity module into Nginx.
Now install Nginx:
make
make install
When the make install command is finished, you can see that Nginx is installed in the "/usr/local/nginx" directory:
cd /usr/local/nginx/

ll
drwxr-xr-x  2 root root 4096 Oct  3 07:21 conf/
drwxr-xr-x  2 root root 4096 Oct  3 07:21 html/
drwxr-xr-x  2 root root 4096 Oct  3 07:21 logs/
drwxr-xr-x  2 root root 4096 Oct  3 07:21 sbin/
5. Configure Nginx
Edit the nginx configuration file with vi/vim and configure nginx to run under the user "www-data".
cd /usr/local/nginx/
vi conf/nginx.conf
On the first line, uncomment the "user" line and change the user to www-data:
user www-data;
Save and Exit.
Create a symlink for the nginx binary so we can use the command "nginx" by directly.
ln -s /usr/local/nginx/sbin/nginx /bin/nginx
Next we will create a systemd script for Nginx that is used to start / stop the Nginx daemon. Please go to the directory "/lib/systemd/system/" and create a new file "nginx.service" with vi:
cd /lib/systemd/system/
vi nginx.service
Paste the script below:
[Service]
Type=forking
ExecStartPre=/usr/local/nginx/sbin/nginx -t -c /usr/local/nginx/conf/nginx.conf
ExecStart=/usr/local/nginx/sbin/nginx -c /usr/local/nginx/conf/nginx.conf
ExecReload=/usr/local/nginx/sbin/nginx -s reload
KillStop=/usr/local/nginx/sbin/nginx -s stop

KillMode=process
Restart=on-failure
RestartSec=42s

PrivateTmp=true
LimitNOFILE=200000

[Install]
WantedBy=multi-user.target
Save and Exit.
Now reload the systemd-daemon so that systemd loads our new Nginx service file.
systemctl daemon-reload
Test the nginx configuration and start nginx with systemctl command:
nginx -t
systemctl start nginx
6. Configure ModSecurity
Copy the ModSecurity configuration file to the nginx directory and name it "modsecurity.conf":
cp /usr/src/modsecurity/modsecurity.conf-recommended /usr/local/nginx/conf/modsecurity.conf
cp /usr/src/modsecurity/unicode.mapping /usr/local/nginx/conf/
Open the modsecurity.conf file with the vi editor:
cd /usr/Local/nginx/conf/
vi modsecurity.conf
In line 7, change "DetectionOnly" to "on".
SecRuleEngine On
In line 38, increase the value of "SecRequestBodyLimit" to "100000000".
SecRequestBodyLimit 100000000
In line 192, change the value of "SecAuditLogType" to "Concurrent" and comment out the line SecAuditLog and uncomment line 196.
SecAuditLogType Concurrent
#SecAuditLog /var/log/modsec_audit.log

# Specify the path for concurrent audit logging.
SecAuditLogStorageDir /opt/modsecurity/var/audit/
Save and Exit.
Now create new directory for the ModSecurity audit log and change the owner to www-data.
mkdir -p /opt/modsecurity/var/audit/
chown -R www-data:www-data /opt/modsecurity/var/audit/
7. Configure OWASP Core Rule Set (CRS)
Download the OWASP Core Rule Set from github.
cd /usr/src/
git clone https://github.com/SpiderLabs/owasp-modsecurity-crs.git
Go to directory "owasp-modsecurity-crs" and copy the directory "base_rules" to the nginx directory.
cd owasp-modsecurity-crs
cp -R base_rules/ /usr/Local/nginx/conf/
Edit modsecurity.conf and add OWASP CRS.
cd /usr/Local/nginx/conf/
vi modsecurity.conf
Please go to the end of the file and add the following configuration:
#DefaultAction
SecDefaultAction "log,deny,phase:1"

#If you want to load single rule /usr/loca/nginx/conf
#Include base_rules/modsecurity_crs_41_sql_injection_attacks.conf

#Load all Rule
Include base_rules/*.conf

#Disable rule by ID from error message (for my wordpress)
SecRuleRemoveById 981172 981173 960032 960034 960017 960010 950117 981004 960015
Save and Exit.
As the last step, add the modsecurity.conf file to the Nginx configuration by editing the "nginx.conf" file.
vi conf/nginx.conf
Add the modsecurity.conf:
[.....]

#Enable ModSecurity
ModSecurityEnabled on;
ModSecurityConfig modsecurity.conf;

root html;
index index.php index.html index.htm;

[.....]
Save and exit.
Restart Nginx to apply the configuration changes:
systemctl restart nginx
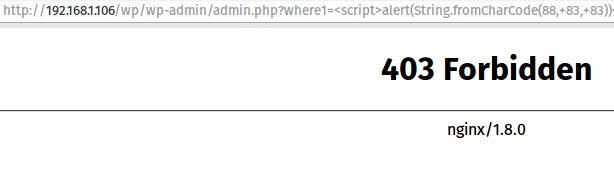
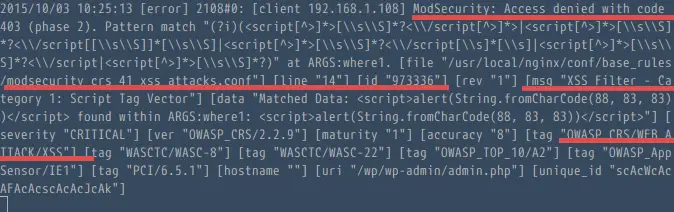
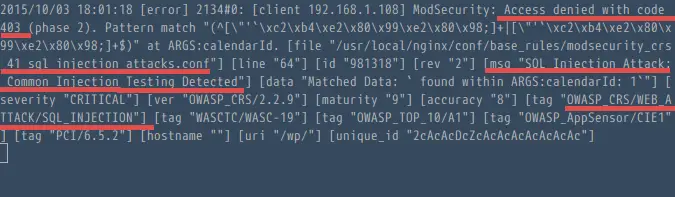
8. Testing
I have a WordPress site running on Nginx and ModSecurity, it is working fine. For testing I will install a new plugin that is vulnerable for XSS and SQL Injection.
Here are the results:
XSS forbidden
https://www.exploit-db.com/exploits/37107/
Browser access:
Server Log:
SQL Injection forbidden
https://www.exploit-db.com/exploits/37560/
Browser Access:

Server Log:
Nginx and ModSecurity successfully.
Conclusion
ModSecurity is an open source WAF (Web Application Firewall) developed by Trustwave's SpiderLabs to secure your web applications. There are more than 16.000 rules available to detect attacks like SQL Injection, XSS, LFI, RFI etc. ModSecurity is easy to install and available as module for Apache, Nginx and IIS for windows.

