How to Install Ghost Blog Software with Apache and SSL on Ubuntu 15.10
This tutorial exists for these OS versions
- Ubuntu 16.04 (Xenial Xerus)
- Ubuntu 15.10 (Wily Werewolf)
On this page
Nodejs is an open source javaScript runtime built on Chrome's V8 JavaScript engine (v4) for developing server-side web applications. Nodejs is a cross-platform runtime that can run on OS X, Microsoft Windows, Linux, and FreeBSD. It provides an event-driven architecture and non-blocking I/O model that makes it lightweight and efficient for real-time web applications. The Node.js project has been started in 2009 by Ryan Dahl and reached version 4.2.0 (LTS) as of today.
Ghost is a powerful open source publishing and blog platform that is beautifully designed and easy to use. Ghost is written in javascript and uses node.js as runtime environment. Ghost has been released in 2013 under MIT license.
Prerequisites
- Ubuntu 15.10
- root privileges
What we will do in this tutorial:
- Install Node.js
- Install Ghost
- Configure Ghost
- Install Apache and add the Ghost VirtualHost
- Enable SSL for Ghost
Step 1- Install Node.js on Ubuntu
For this tutorial, we will use node.js v0.12. Node.js can be installed from source or from the nodesource.com repository. We will use the node.js repository https://deb.nodesource.com/node_0.12 for the installation.
Please add and update repository by executing command below:
curl -sL https://deb.nodesource.com/setup_0.12 | sudo bash -
Next install node.js with apt:
sudo apt-get install -y nodejs
Now check node.js version:
node --version

v0.12.7
And check npm version:
npm --version

2.11.3
Npm is the node.js package manager that is used to install, publish and manage node programs.
Step 2 - Install Ghost Blog
We will install ghost in the directory "/var/www/" and use the latest version of Ghost. Please make a new directory "www" in /var and enter it with "cd":
mkdir -p /var/www/
cd /var/www/
Download Ghost with the wget command, then extract it to a directory called "ghostblog" :
wget https://ghost.org/zip/ghost-latest.zip
unzip -d ghostblog ghost-latest.zip
NOTE : -d : automatically creates the directory.
Then go to the ghostblog directory and install Ghost with the npm command as root/sudo:
cd ghostblog/
npm install --production
Step 3 - Configure Ghost
Please go to the ghostblog directory and then copy the config sample file to "config.js"
cd /var/www/ghostblog/
cp config.example.js config.js
Now open the config file with the vim editor:
vim config.js
In the server block (line 27), change host value to 0.0.0.0.
host = 0.0.0.0
To allow the blog to be accessed from outside. Save and exit.
Then add new user "ghost". This user will be used to run ghost:
sudo adduser --shell /bin/bash ghost
ENTER YOUR PASSWORD
Now change the owner for ghost installation directry to the user "ghost".
chown -R ghost:ghost /var/www/ghostblog
Test the ghost blog by executing the npm command as ghost user. Please log in to the user ghost:
su - ghost
And go to the Ghost installation directory and start it:
cd /var/www/ghostblog
npm start --production
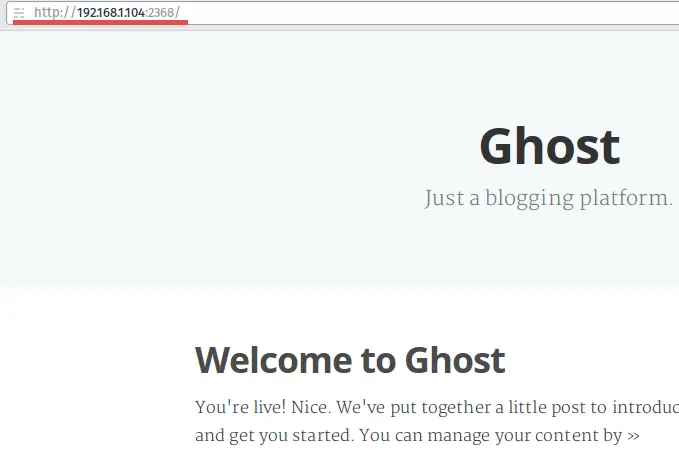
Visit the server IP on port 2368, in my case: 192.168.1.104:2368
To make it easier for us to start ghost, we will create a systems service to run Ghost. Please go back to the sudo/root user and make a new file called "ghost.service" in the directory "/lib/systemd/system/".
sudo cd /lib/systemd/system/
sudo vim ghost.service
Paste the systemd script below:
[Unit]
Description=ghost
After=network.target

[Service]
Type=simple
# Ghost installation Directory
WorkingDirectory=/var/www/ghostblog
User=ghost
Group=ghost
ExecStart=/usr/bin/npm start --production
ExecStop=/usr/bin/npm stop --production
Restart=always
SyslogIdentifier=Ghost

[Install]
WantedBy=multi-user.target
And save the file Then reload the systemd daemon:
sudo systemctl daemon-reload
Add the Ghost service to start automatically at boot time and start Ghost with systemctl command:
sudo systemctl enable ghost
sudo systemctl start ghost
Step 4 - Install Apache and the Ghost VirtualHost
Install apache with the apt-get command:
sudo apt-get install apache2
Once the installation is finished, create a new file for the ghost virtual host in the directory "/etc/apache2/sites-available/".
sudo cd /etc/apache2/sites-available/
sudo vim ghostblog.conf
Paste the configuration below:
<VirtualHost *:80>
    #Domain Name
    ServerName ghostblog.me
    ServerAlias www.ghostblog.me

    #HTTP proxy/gateway server
    ProxyRequests off
    ProxyPass / http://127.0.0.1:2368/
    ProxyPassReverse / http:/127.0.0.1:2368/
</VirtualHost>
Save and exit.
Activate the HTTP proxy module in apache with the command a2enmod as shown below:
sudo a2enmod proxy proxy_http
Finally, we have to activate the Ghost virtual host and then restart apache:
sudo a2ensite ghostblog
sudo systemctl restart apache2
Restart ghost:
sudo systemctl restart ghost
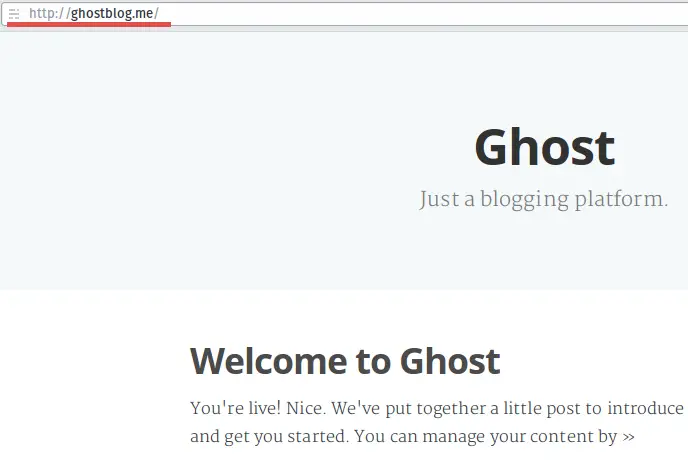
Test by visiting the domain: http://ghostblog.me
Step 5 - Enable SSL for Ghost
To enable SSL on apache, please make sure the openssl library is installed on the system. We will generate new key and crt file in the directory "/etc/apache2/certs". First we make new directory certs:
sudo mkdir -p /etc/apache2/certs
And generate the certificate key with the command below :
sudo openssl req -x509 -nodes -days 365 -newkey rsa:2048 -keyout /etc/apache2/certs/ghostblog.key -out /etc/apache2/certs/ghostblog.crt
Please change the permission of certificate file:
sudo cd /etc/apache2/certs/
sudo chmod 600 *
Next, add the ssl configuration to ghost virtualhost by editing the "ghostblog.conf" file.
sudo cd /etc/apache2/sites-available/
sudo vim ghostblog.conf
Paste the new configuration script below:
<VirtualHost *:80>
    ServerName ghostblog.me
    ServerAlias www.ghostblog.me

    # Force http to https
    Redirect permanent / https://ghostblog.me/
#    ProxyRequests off
#    ProxyPass / http://127.0.0.1:2368/
#    ProxyPassReverse / http:/127.0.0.1:2368/
</VirtualHost>

<VirtualHost *:443>

   ServerName ghostblog.me

   SSLEngine on
   SSLCertificateFile /etc/apache2/certs/ghostblog.crt
   SSLCertificateKeyFile /etc/apache2/certs/ghostblog.key

   ProxyPass / http://127.0.0.1:2368/
   ProxyPassReverse / http:/127.0.0.1:2368/
   ProxyPreserveHost   On

   RequestHeader set X-Forwarded-Proto "https"

</VirtualHost>
Save and Exit.
Activate the OpenSSL apache module and restart apache :
sudo a2enmod ssl headers
sudo systemctl restart apache2
Testing
Visit http://ghostblog.me, and you will be forced to the HTTPS/SSL site of your blog.

Ghost with apache and SSL is now successfully installed.
Conclusion
Nodejs is an open source multi-platform javascript runtine to build server-side web applications. It is lightweight and efficient for real-time web applications. Ghost is a blogging platform written in Javascript for Node.js. Ghost is beautifully designed and user-friendly. The intuitive interface makes this blog system easy to use. Ghost can be installed standalone or with a web server like Apache or Nginx. You can secure Ghost with openssl. Configuring Ghost with Apache and OpenSSL is easy, you just have to setup the apache http_proxy module and generate an SSL Certificate.

