How to install Nginx as Reverse Proxy for Apache on Ubuntu 15.10
This tutorial exists for these OS versions
- Ubuntu 16.04 (Xenial Xerus)
- Ubuntu 15.10 (Wily Werewolf)
- Ubuntu 12.04 LTS (Precise Pangolin)
On this page
Nginx or "engine-x" is a high-performance web server with low memory usage, created by Igor Sysoev in 2002. Nginx is not just a web server, it can be used as a reverse proxy for many protocols like HTTP, HTTPS, POP3, SMTP, and IMAP and as a load balancer and HTTP cache as well.
Apache is the most popular web server software maintained by the open source community under Apache Software Foundation. There are many add-on modules available for apache like WebDav support or web application firewalls like mod_security and it supports many web programming languages like Perl, Python, PHP trough native modules or by cgi, fcgi and FPM interfaces.
In this tutorial, I will install and configure Nginx as a caching reverse proxy for an Apache web server on Ubuntu 15.10, Nginx is used as the front end and Apache as the back end. Nginx will run on port 80 to respond to requests from a user/browser, the request will then be forwarded to the apache server that is running on port 8080.
Step 1 - Install Apache and PHP
Log in to your ubuntu server with SSH and become root user by running:
sudo su
Then install apache with the apt-get command:
apt-get install apache2
Once apache is installed, we must install PHP as apache module for this tutorial:
apt-get install php5 php5-mysql libapache2-mod-php5
Step 2 - Configure Apache and PHP
By default, apache listens on port 80. We have to configure apache to run on port 8080 for our proxy setup as port 80 will be used by nginx later.
If you want to change the port for apache web server, you must edit the apache configuration file "/etc/apache2/ports.conf", and then proceed with the virtual host configuration in the "/etc/apache2/sites-available/" directory.
First change the port for apache to 8080 by editing the file "ports.conf" with the vim editor:
vim /etc/apache2/ports.conf
On line 5, change port 80 to 8080.
Listen 8080
Save and exit.
Now go to the virtualhost directory and edit the file "000-default.conf" :
cd sites-available/
vim 000-default.conf
Make sure your configuration is same as below:
<VirtualHost *:8080>

    ServerName www.reverse.com
    ServerAlias reverse.com

    ServerAdmin webmaster@localhost
    DocumentRoot /var/www/html

    ErrorLog ${APACHE_LOG_DIR}/error.log
    CustomLog ${APACHE_LOG_DIR}/access.log combined

</VirtualHost>
Save and exit.
Next, test the configuration and restart apache:
apachectl configtest
systemctl restart apache2
Fiinally we verify that the apache and php is working. Create a new file with the name "info.php" in the directory "/var/www/html/".
cd /var/www/html/
echo "<?php phpinfo(); ?>" > info.php
Visit your site www.reverse.com:8080/info.php.
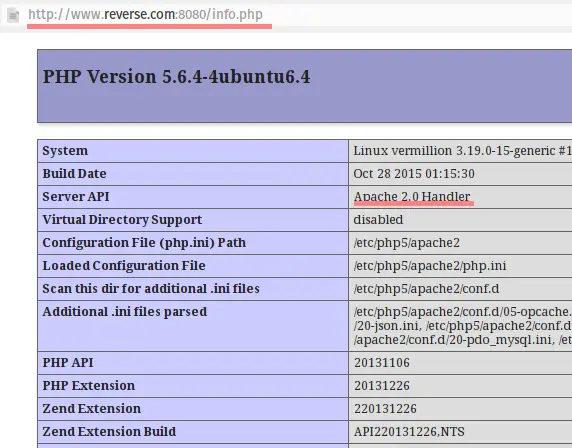
The result should be similar to the above screenshot.
Step 3 - Install Nginx
Install Nginx with the following apt-get command:
apt-get install nginx
Step 4 - Configure Nginx
Once Nginx is installed, configure Nginx to act as reverse proxy for the apache web server that running on port 8080.
Go to the nginx configuration directory and edit the file "nginx.conf":
cd /etc/nginx/
vim nginx.conf
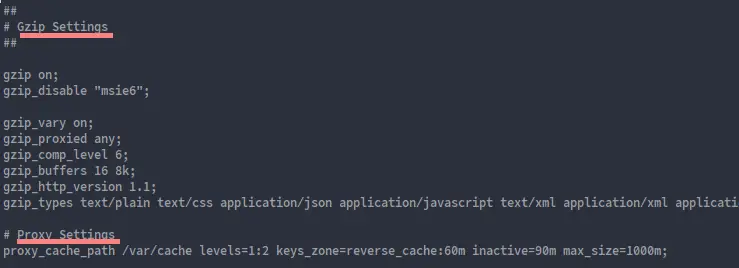
Enable Gzip compression for Nginx by uncomment the gzip lines:
        # Gzip Settings
        ##

        gzip on;
        gzip_disable "msie6";

        gzip_vary on;
        gzip_proxied any;
        gzip_comp_level 6;
        gzip_buffers 16 8k;
        gzip_http_version 1.1;
        gzip_types text/plain text/css application/json application/javascript text/xml application/xml application/xml+rss text/javascript;
most important is :
gzip on : to turn gzip compression.
gzip_types : is list of MIME-types which you want to turn the compression.
gzip_proxied any : is enable compression for proxied request.
Right under gzip settings, add these proxy cache settings:
        # Proxy Cache Settings
        proxy_cache_path /var/cache levels=1:2 keys_zone=reverse_cache:60m inactive=90m max_size=1000m;
The directory for the proxy cache is /var/cache.
levels is a directive that tells Nginx how the cache is saved in file system.
key_zone is just a name of the cache zone, you can choose it freely, but don't add special chars or whitespace in the name. I will use the name "reverse_cache" here.
Save and Exit.
Now we will configure a virtualhost in the directory "/etc/nginx/sites-available".
In this tutorial, I'll create a new virtualhost configuration file named "reverse.conf". Just got to the directory and create new file with vim:
cd /etc/nginx/sites-available
vim reverse.conf
Paste the configuration below:
server {
    listen 80;

    # Site Directory same in the apache virtualhost configuration
    root /var/www/html;
    index index.php index.html index.htm;

    # Domain
    server_name www.reverse.com reverse.com;

    location / {
        try_files $uri $uri/ /index.php;
    }


    # Reverse Proxy and Proxy Cache Configuration
    location ~ \.php$ {

        proxy_set_header X-Real-IP $remote_addr;
        proxy_set_header X-Forwarded-For $remote_addr;
        proxy_set_header Host $host;
        proxy_pass http://127.0.0.1:8080;

        # Cache configuration
        proxy_cache reverse_cache;
        proxy_cache_valid 3s;
        proxy_no_cache $cookie_PHPSESSID;
        proxy_cache_bypass $cookie_PHPSESSID;
        proxy_cache_key "$scheme$host$request_uri";
        add_header X-Cache $upstream_cache_status;
    }

    # Enable Cache the file 30 days
    location ~* .(jpg|png|gif|jpeg|css|mp3|wav|swf|mov|doc|pdf|xls|ppt|docx|pptx|xlsx)$ {
        proxy_cache_valid 200 120m;
        expires 30d;
        proxy_cache reverse_cache;
        access_log off;
    }

    # Disable Cache for the file type html, json
    location ~* .(?:manifest|appcache|html?|xml|json)$ {
        expires -1;
    }

    location ~ /\.ht {
        deny all;
    }
}
Save and exit.
Then activate the new virtualhost configuration:
ln -s /etc/nginx/sites-available/reverse.conf /etc/nginx/sites-enabled/
Finally we will test the nginx configuration and restart nginx:
nginx -t
systemctl restart nginx
Nginx is configured as reverse proxy now. You can test it with curl:
curl -I www.reverse.com
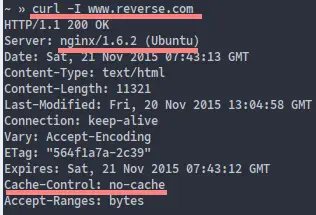
Cache-Control: no-cache means index.html and all file ended with .html will not cache.
Another test:
curl -I www.reverse.com/info.php
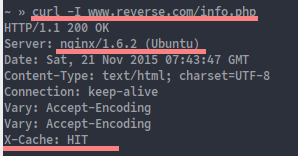
X-Cache: HIT means the page is being served by the Nginx cache.
Step 5 - Configure Logging
In this step, I will configure apache to log the real ip of the visitor instead of the local IP.
Please install the apache module "libapache2-mod-rpaf" and edit the module configuration file:
sudo apt-get install libapache2-mod-rpaf
cd /etc/apache2/mods-available/
vim rpaf.conf
Add the server IP to the line 10. My server has the IP: 192.168.1.108.
RPAFproxy_ips 127.0.0.1 192.168.1.108 ::1
Save and exit.
Now restart apache :
systemctl restart apache2
Test rpaf by viewing the apache access log with the tail command:
tail -f /var/log/apache2/access.log
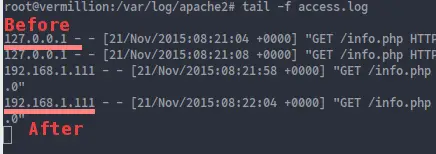
That's all.
Nginx is installed as reverse proxy in front of the Apache web server. If a visitor requests a php file, the request will be passed to apache on port 8080, and you can see the real ip visitor on the apache log file.
Conclusion
Nginx is fast and popular web server with low memory usage that can act as web server and reverse proxy for HTTP and HTTPS protocol. Nginx reverse proxy for apache is a setup that uses Nginx as front end, and apache as back end. Nginx handles the incoming request from the browser and passes it to the apache backend. In this tutorial, we have setup a configuration for nginx as http cache that caches PHP file requests and images.

