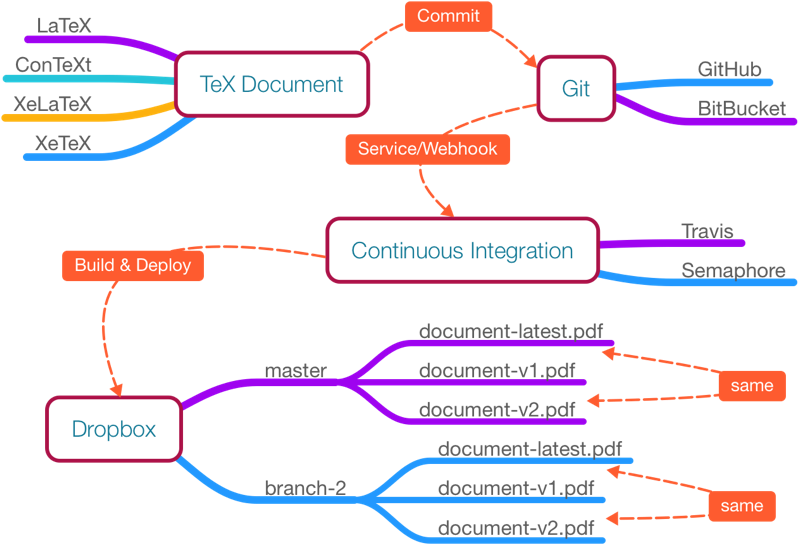
The power of Git, Docker, and continuous integration (CI) can be leveraged to make TeX document compilation easy while keeping track of different variants and versions. On the top of these technologies, a flexible workflow can be developed to reflect successive changes in TeX documents in each PDF—versioned with a progressive number, document-v4.pdf, say. So, let's create a workflow that can automate the process for us.
1. Objective
Use Git, Docker, and continuous integration (CI) to build TeX documents and upload the PDF to Dropbox with a proper branch structure and versioning.
2. Workflow

3. Requirements
We need:
- Git service
- Bitbucket
- GitHub
- Continuous integration and deployment service
- Semaphore
- Travis
- Dropbox account
3.1. Dropbox Uploader
Note: While configuring Dropbox API, use of App Folder only as access level is recommended.
To upload generated PDF to Dropbox, we will use Dropbox Uploader.
- Follow Dropbox Uploader's README.md and configure it on your local machine.
- Verify that you have
~/.dropbox_uploaderfile on your local machine. We will use this file later.
4. Prepare Git repository
Initialize Git (git init) and use following directory structure for your git repository:
├── docker
|   ├── Dockerfile
├── document.tex
Now for docker/Dockerfile, we will use harshjv/texlive-2015 docker image. This image contains TeX Live 2015.
4.1. Dockerfile
FROM harshjv/texlive-2015
RUN tlmgr update --self --all
This will build Docker image with latest packages for building TeX documents.
5. Add your TeX documents
Add some TeX files to your repository.
6. Configure Git service
For Webhooks/Services, we need to configure Git services as follows;
6.1. For Bitbucket
No configuration needed as of now.
6.2. For GitHub
- Go to your repository's Settings -> Webhooks & services -> Services
- Select Travis CI
7. Configure continuous integration service
7.1. For Semaphore
- Do an initial commit and push to remote branch (if empty remote repository), because it requires, at least, one remote branch.
- Go to SemaphoreCI
- Add new project
- Select your Git service
- Select your repository
- Select branch (e.g., master)
7. Select your account
After these initial steps, now it's time to configure build and deployment.
7.1.1. Setup thread
This setup script builds docker/Dockerfile with latest TeX packages and fetches Dropbox Uploader script.
sudo docker build -t texlive docker
curl "https://raw.githubusercontent.com/andreafabrizi/Dropbox-Uploader/master/dropbox_uploader.sh" -o dropbox_uploader.sh
chmod +x dropbox_uploader.sh
7.1.2. Build Thread
Note: For document.lex in master branch, document.pdf will be uploaded as:
Dropbox/[YOUR_APP_FOLDER]/master/document-latest.pdf
Dropbox/[YOUR_APP_FOLDER]/master/document-v[BUILD_NUMBER].pdf
This build script compiles document.lex LeX document and builds document.pdf PDF. Then, using Dropbox Uploader, versioned PDF files are stored in branch's individual folder.
sudo docker run -it -v ${SEMAPHORE_PROJECT_DIR}:/var/texlive texlive sh -c "pdflatex document.lex"
./dropbox_uploader.sh upload document.pdf ${BRANCH_NAME}/document-latest.pdf
./dropbox_uploader.sh upload document.pdf ${BRANCH_NAME}/document-v${SEMAPHORE_BUILD_NUMBER}.pdf
Any successive commit will overwrite document-latest.pdf and will create a new document-v[BUILD_NUMBER].pdf file.
7.1.3. Configuration Files
- Visit Project Settings -> Configuration Files
- Add configuration file
- Add
.dropbox_uploaderto file path - (Optional) Check encryption
- Paste content of
~/.dropbox_uploader- In MacOS X,
pbcopy ~/.dropbox_uploader
- In MacOS X,
7.2. For Travis
The script for setup procedure and building remains the same. Put these scripts into individual files and create a .travis.yml file. Refer this post for relevant instructions.
8. Git commit and push
It's time to push the documents/changes.
git add .
git commit -m "Add some details"
git push origin master
9. Success!
Tip: If you want to share only the latest PDF after changes, use URL shortener service like Bit.ly to point to this latest document after getting sharing link from Dropbox.
Why? Because for each branch folder,
[DOCUMENT_NAME]-latest.pdfwill always contain latest PDF.
After a successful build, generated PDF files will be available at Dropbox/[YOUR_APP_FOLDER]/master folder.


2 Comments