How to Install Drupal 8 with Nginx, PHP-FPM and SSL on Ubuntu 15.10
This tutorial exists for these OS versions
- Ubuntu 20.04 (Focal Fossa)
- Ubuntu 16.04 (Xenial Xerus)
- Ubuntu 15.10 (Wily Werewolf)
On this page
Drupal is a well-known open source content management system based on PHP. It is available free of charge and released under the GNU General Public License. Drupal can be used for all sizes of websites, from huge international websites to personal blogs and corporate or government sites. The core part of drupal is named "Drupal Core", it contains the basic content management system, user management, menu management, lay out customization and system administration. Drupal Core can be extended by plugins, until now, the drupal community has been provided more than 31.000 modules for Drupal. The Current Drupal version is 8.0.
In this tutorial, we will install Drupal 8 with Nginx web server, MariaDB as the database server and PHP-FPM to handle PHP requests. I will also show you how to install an SSL Certificate to secure the Drupal website.
Prerequisites
- Ubuntu 15.10 - 64bit version.
- Root privileges.
Step 1 - Update the Ubuntu system
Login to the ubuntu server with ssh, then become root user and update the ubuntu repository:
sudo su
sudo apt-get update
Step 2 - Install Nginx and PHP-FPM
Nginx or "engine-x" is fast HTTP server that is focused on high performance with low memory/RAM usage. We can use Nginx also as reverse proxy, for HTTP, HTTPS, POP3 and IMAP protocols. In this tutorial, we will use Nginx as SSL enabled HTTP server.
Install Nginx with the following apt command as sudo/root user:
sudo apt-get install nginx -y
Next, install php-fpm with php-gd that is required by drupal core:
apt-get install php5-fpm php5-cli php5-gd php5-mysql -y
In the next step, we will configure Nginx.
Step 3 - Configure Nginx and PHP-FPM
In this step, we will configure Nginx to use php-fpm to serve HTTP requests for PHP pages. Go to the php-fpm directory "/etc/php/fpm" and edit the "php.ini" file:
cd /etc/php/fpm/
vim php.ini
On line 773, uncomment the cgi.fix_pathinfo line and change the value to "0".
cgi.fix_pathinfo=0
Save the file and exit the editor.
Now we modify the default nginx virtualhost configuration. Edit the "default" file and enable the php-fpm directive.
cd /etc/nginx/sites-available/
vim default
Uncomment line 45 - 52 to use php-fpm with nginx.
        location ~ \.php$ {
                include snippets/fastcgi-php.conf;
        #
        #       # With php5-cgi alone:
        #       fastcgi_pass 127.0.0.1:9000;
        #       # With php5-fpm:
                fastcgi_pass unix:/var/run/php5-fpm.sock;
        }
Save the file and exit.
Then test the Nginx configuration with the command "nginx -t" to ensure that it is valid:
nginx -t
If there is no error, restart nginx and the php-fpm service:
systemctl restart nginx
systemctl restart php5-fpm
Next, test that php-fpm is working properly with nginx by creating new php info file in the web directory "/var/www/html".
cd /var/www/html/
echo "<?php phpinfo(); ?>" > info.php
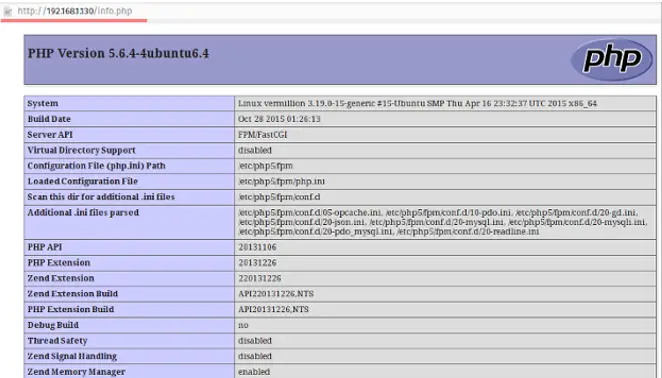
Visit the server IP: 192.168.1.101/info.php a web browser. The result should be similar to the screenshot below.
Step 4 - Install and Configure MariaDB
MariaDB is database server fork of the MYSQL relational database management system, it offers a drop-in replacement functionality for mysql.
Install the latest version of MariaDB with the apt-get command:
sudo apt-get install mariadb-client mariadb-server -y
When the installation has been completed, start MariaDB:
systemctl start mysql
The MariaDB service name is "mysql", thats why the systemctl command uses the word mysql here.
Now we will configure the MariaDB username and password with command below:
mysql_secure_installation
Log into the MariaDB shell with your password and create new database for drupal called "drupaldb" and create new MariaDB/MySQL user "drupaluser" with the password "drupaluser@" and finally then grant the user permissions to the database. Please choose a secure password instead of "drupaluser@" for your installation!
mysql -u root -p


create database drupaldb;
create user drupaluser@localhost identified by 'drupaluser@';
grant all privileges on drupaldb.* to drupaluser@localhost identified by 'drupaluser@';
flush privileges;
\q
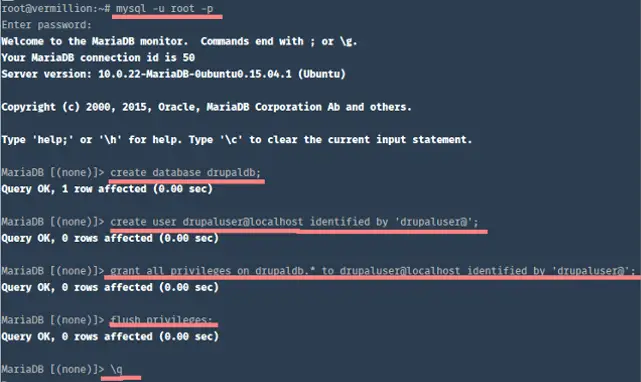
The Database "drupaldb" with user "drupaluser" has been created.
Step 5 - Generate Self Signed SSL Certificate
Go to the /etc/nginx directory and create a new directory with the name "ssl" for SSL configuration file.
mkdir -p /etc/nginx/ssl
cd /etc/nginx/ssl
Then generate a new self signed SSL certificate with the openssl command below:
openssl req -x509 -nodes -days 365 -newkey rsa:2048 -keyout /etc/nginx/ssl/drupal.key -out /etc/nginx/ssl/drupal.crt
Fill in the requested info. The SSL certificate file has been generated, now change the permissions of the private key file "drupal.key" to 600:
chmod 600 drupal.key
Step 6 - Configure the VirtualHost for Drupal
We will install Drupal 8 in the directory "/var/www/drupal8" with the domain name "drupal8.me". Please replace the domain name in your installation with the domain name of the website that you want to use this drupal installation for. So let's create the directory:
mkdir -p /var/www/drupal8
Then go to the Nginx virtualhost directory "/etc/nginx/sites-available/" and create a new file "drupal8" with the vim editor:
cd /etc/nginx/sites-available/
vim drupal8
Paste the Nginx configuration for drupal below into the file drupal8:
server {
    server_name drupal8.me;
    root /var/www/drupal8; ## <-- Your only path reference.

    listen 80;
    listen [::]:80;
    listen 443 default ssl;

    ssl_certificate      /etc/nginx/ssl/drupal.crt;
    ssl_certificate_key  /etc/nginx/ssl/drupal.key;

    # Redirect HTTP to HTTPS
    if ($scheme = http) {
        return 301 https://$server_name$request_uri;
    }

    location = /favicon.ico {
        log_not_found off;
        access_log off;
    }

    location = /robots.txt {
        allow all;
        log_not_found off;
        access_log off;
    }

    # Very rarely should these ever be accessed outside of your lan
    location ~* \.(txt|log)$ {
        allow 192.168.0.0/16;
        deny all;
    }

    location ~ \..*/.*\.php$ {
        return 403;
    }

    location ~ ^/sites/.*/private/ {
        return 403;
    }

    # Block access to "hidden" files and directories whose names begin with a
    # period. This includes directories used by version control systems such
    # as Subversion or Git to store control files.
    location ~ (^|/)\. {
        return 403;
    }

    location / {
        # try_files $uri @rewrite; # For Drupal <= 6
        try_files $uri /index.php?$query_string; # For Drupal >= 7
    }

    location @rewrite {
        rewrite ^/(.*)$ /index.php?q=$1;
    }

    # In Drupal 8, we must also match new paths where the '.php' appears in the middle,
    # such as update.php/selection. The rule we use is strict, and only allows this pattern
    # with the update.php front controller.  This allows legacy path aliases in the form of
    # blog/index.php/legacy-path to continue to route to Drupal nodes. If you do not have
    # any paths like that, then you might prefer to use a laxer rule, such as:
    #   location ~ \.php(/|$) {
    # The laxer rule will continue to work if Drupal uses this new URL pattern with front
    # controllers other than update.php in a future release.
    location ~ '\.php$|^/update.php' {
        fastcgi_split_path_info ^(.+?\.php)(|/.*)$;
        #NOTE: You should have "cgi.fix_pathinfo = 0;" in php.ini
        include fastcgi_params;
        fastcgi_param SCRIPT_FILENAME $request_filename;
        fastcgi_intercept_errors on;
        fastcgi_pass unix:/var/run/php5-fpm.sock;
    }

    # Fighting with Styles? This little gem is amazing.
    # location ~ ^/sites/.*/files/imagecache/ { # For Drupal <= 6
    location ~ ^/sites/.*/files/styles/ { # For Drpal >= 7
        try_files $uri @rewrite;
    }

    location ~* \.(js|css|png|jpg|jpeg|gif|ico)$ {
        expires max;
        log_not_found off;
    }
}
Save the file and exit the editor.
The Drupal virtual host file has been created, now we have to activate it by creating a symlink to the file in the "sites-enabled" directory:
ln -s /etc/nginx/sites-available/drupal8 /etc/nginx/sites-enabled/
Test the Nginx configuration and restart Nginx:
nginx -t
systemctl restart nginx
Step 7 - Install and Configure Drupal
We have to install git and drush before we start with the Drupal installation. Drush is a command line shell and Unix scripting interface for Drupal. Install it with apt the following command:
sudo apt-get install git drush -y
Then enter the drupal8 directory that we created earlier and download Drupal with the git or drush command:
cd /var/www/drupal8
git clone --branch 8.0.x http://git.drupal.org/project/drupal.git
If you want to use drush, run the command below instead:
drush dl drupal-8
Wait until the download finished, then move all Drupal files to the main directory:
mv drupal/* /var/www/drupal8/
In the next step we will configure the Drupal settings file. From Drupal main directory, go to the "sites/default" directory and copy the two configuration files "settings.php" and "services.yml":
cd sites/default
cp default.settings.php settings.php
cp default.services.yml services.yml
Then we have to make a new directory with the name "files" inside the "sites/default" directory. The "chmod" command ensures that the configuration file and the "files" directory are writable for Drupal installation:
mkdir files/
chmod a+w *
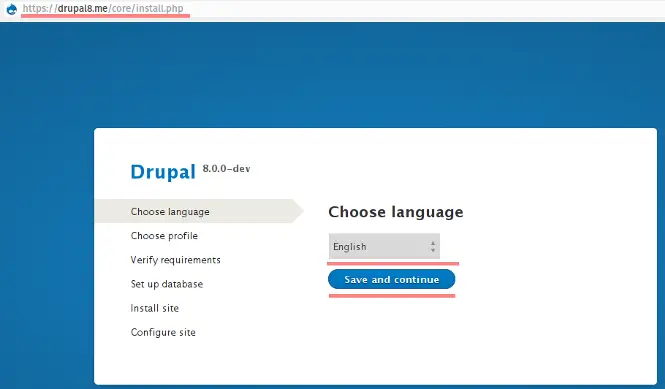
Now visit your Drupal site (in my case http://drupal8.me) with the web Browser, you will be redirected to the https connection automatically and the Drupal installer page shows up.
Choose your language, I'm will use "English" here.
Click "Save and continue".
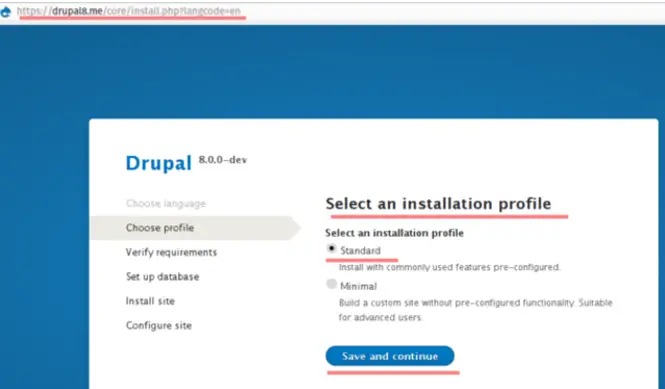
Now select the installation type. You can use standard or minimal type. I will use "Standard".
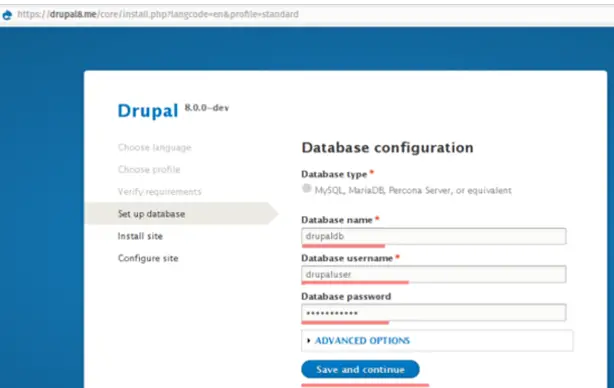
Now you will be shown database configuration page. Fill in the database details for the database that we have created for Drupal.
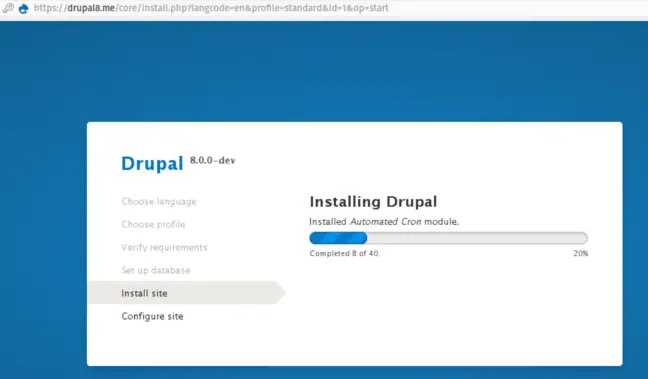
Wait until the installation finished.
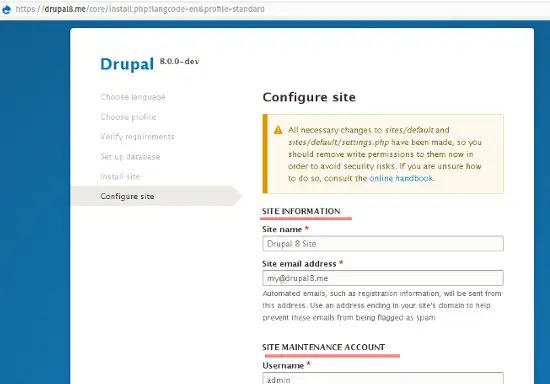
Now we have to configure the site profile settings like sitename, user and password for admin, email etc.
Now Drupal is installed. You will get redirected to the Drupal home page.
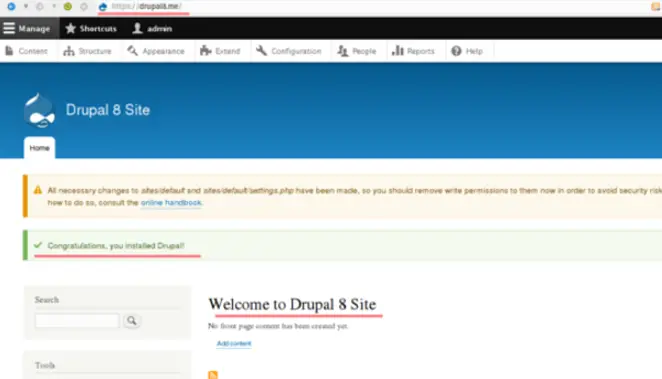
You will see an error message about the permissions of the drupal configuration files "settings.php" and "services.yml". Just change the permission of them with the following commands:
cd sites/default/
chmod 644 settings.php services.yml
Now Drupal 8 is installed with Nginx and SSL on ubuntu 15.10.
Conclusion
Drupal is free, open-source content management framework based on PHP. It can be used for a personal blog, private homepage or corporate website. Drupal is distributed under the GNU license. The main component of Drupal is called the "Drupal Core" and until now the Drupal community developed more than 31.000 modules to extend it. The current stable version is 8.0. Drupal is easy to install and configure, we can use Nginx or Apache as the web server and PHP-FPM to handle the PHP requests.

