How to install and configure vsftpd with TLS on Debian 8 (Jessie)
This tutorial exists for these OS versions
- Debian 12 (Bookworm)
- Debian 11 (Bullseye)
- Debian 8 (Jessie)
- Debian 6 (Squeeze)
On this page
This article explains how to set up a TLS enabled vsftpd server on a Debian 8 server and how to access the FTP server with FileZilla. FTP is a very insecure protocol by default because all passwords and all data are transferred in clear text. By using TLS, the whole communication can be encrypted, thus making FTP much more secure.
1 Preliminary Note
In this tutorial, I will use the hostname server1.example.com with the IP address 192.168.1.100. These settings might differ for you, so you have to replace them where appropriate. I use the Debian 8 minimal server setup as the basis for this tutorial.
2 Installing vsftpd And OpenSSL
OpenSSL is needed by TLS; to install vsftpd and OpenSSL, we simply run:
apt-get -y install vsftpd openssl
3 Creating The SSL Certificate For TLS
In order to use TLS, we must create an SSL certificate. I create it in /etc/ssl/private - if the directory doesn't exist, create it now::
mkdir -p /etc/ssl/private
chmod 700 /etc/ssl/private
Afterwards, we can generate the SSL certificate as follows:
openssl req -x509 -nodes -days 365 -newkey rsa:1024 -keyout /etc/ssl/private/vsftpd.pem -out /etc/ssl/private/vsftpd.pem
Country Name (2 letter code) [AU]: <-- Enter your Country Name (e.g., "DE").
State or Province Name (full name) [Some-State]:<-- Enter your State or Province Name.
Locality Name (eg, city) []:<-- Enter your City.
Organization Name (eg, company) [Internet Widgits Pty Ltd]:<-- Enter your Organization Name (e.g., the name of your company).
Organizational Unit Name (eg, section) []:<-- Enter your Organizational Unit Name (e.g. "IT Department").
Common Name (eg, YOUR name) []:<-- Enter the Fully Qualified Domain Name of the system (e.g. "server1.example.com").
Email Address []:<-- Enter your Email Address.
4 Enabling TLS In vsftpd
In order to enable TLS in vsftpd, open /etc/vsftpd.conf...
nano /etc/vsftpd.conf
... and add or change the following options:
[...]

# Turn on SSL
ssl_enable=YES

# Allow anonymous users to use secured SSL connections
allow_anon_ssl=YES

# All non-anonymous logins are forced to use a secure SSL connection in order to
# send and receive data on data connections.
force_local_data_ssl=YES

# All non-anonymous logins are forced to use a secure SSL connection in order to send the password.
force_local_logins_ssl=YES

# Permit TLS v1 protocol connections. TLS v1 connections are preferred
ssl_tlsv1=YES

# Permit SSL v2 protocol connections. TLS v1 connections are preferred
ssl_sslv2=NO

# permit SSL v3 protocol connections. TLS v1 connections are preferred
ssl_sslv3=NO

# Disable SSL session reuse (required by WinSCP)
require_ssl_reuse=NO

# Select which SSL ciphers vsftpd will allow for encrypted SSL connections (required by FileZilla)
ssl_ciphers=HIGH

# This option specifies the location of the RSA certificate to use for SSL
# encrypted connections.
rsa_cert_file=/etc/ssl/private/vsftpd.pem
[...]
If you use force_local_logins_ssl=YES and force_local_data_ssl=YES, then only TLS connections are allowed (this locks out any users with old FTP clients that don't have TLS support); by using force_local_logins_ssl=NO and force_local_data_ssl=NO both TLS and non-TLS connections are allowed, depending on what the FTP client supports.
Apart from the TLS options, make sure you also have the following settings in your vsftpd.conf to enable non-anonymous logins:
[...]
# Uncomment this to allow local users to log in.
local_enable=YES
#
# Uncomment this to enable any form of FTP write command.
write_enable=YES
#
# Default umask for local users is 077. You may wish to change this to 022,
# if your users expect that (022 is used by most other ftpd's)
local_umask=022

[...]
Restart vsftpd afterwards:
service vsftpd restart
That's it. You can now try to connect using your FTP client; however, you should configure your FTP client to use TLS (this is a must if you use force_local_logins_ssl=YES and force_local_data_ssl=YES) - see the next chapter how to do this with FileZilla.
5 vsftpd add user
In this step, we will add a local Linux user that we can use to connect to. I will create a user "till" with the password "howtoforge". All FTP users shall have their home directories in mkdir /var/ftproot, so I'll create this directory first.
mkdir /var/ftproot
Then add the user with the command:
adduser --home /var/ftproot/till till
The adduser command will ask for the user password and some other details
root@server1:/# adduser --home /var/ftproot/till till
Adding user `till' ...
Adding new group `till' (1001) ...
Adding new user `till' (1001) with group `till' ...
Creating home directory `/var/ftproot/till' ...
Copying files from `/etc/skel' ...
Enter new UNIX password: <-- Enter the new password here
Retype new UNIX password: <-- Enter the new password here
passwd: password updated successfully
Changing the user information for till
Enter the new value, or press ENTER for the default
Full Name []: <-- Enter your name here or press enter to skip
Room Number []: <-- Enter room number here or press enter to skip
Work Phone []: <-- Enter work phone here or press enter to skip
Home Phone []: <-- Enter home phone here or press enter to skip
Other []: <-- Enter Other user details here or press enter to skip
Is the information correct? [Y/n] <-- Y
We successfully added a FTP user.
6 Configuring FileZilla for TLS
In order to use FTP with TLS, you need an FTP client that supports TLS, such as FileZilla.
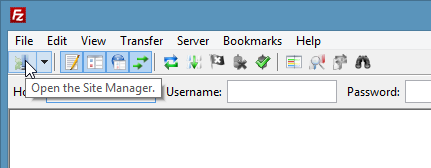
In FileZilla, open the Server Manager:
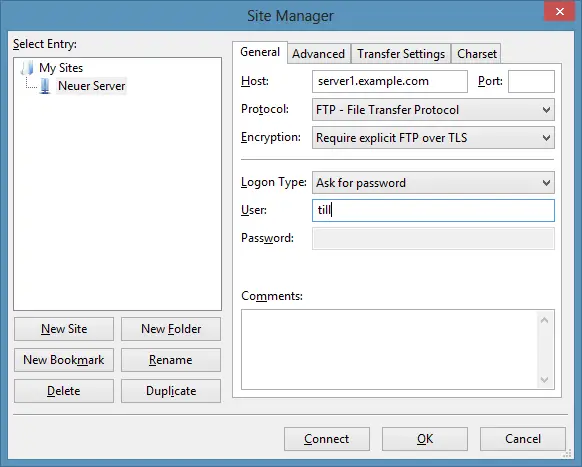
Enter the IP address or hostname of the FTP server in the server field, select the protocol "FTP" and "Require Explicit FTP over TLS", and enter the username in the user field.
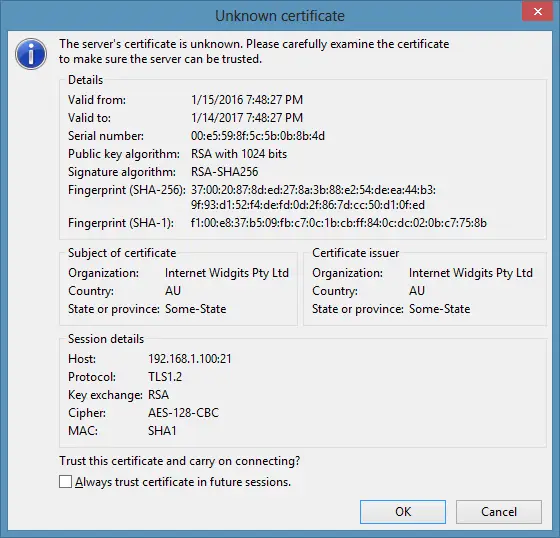
Now you can connect to the server. If you do this for the first time, you must accept the server's new SSL certificate:
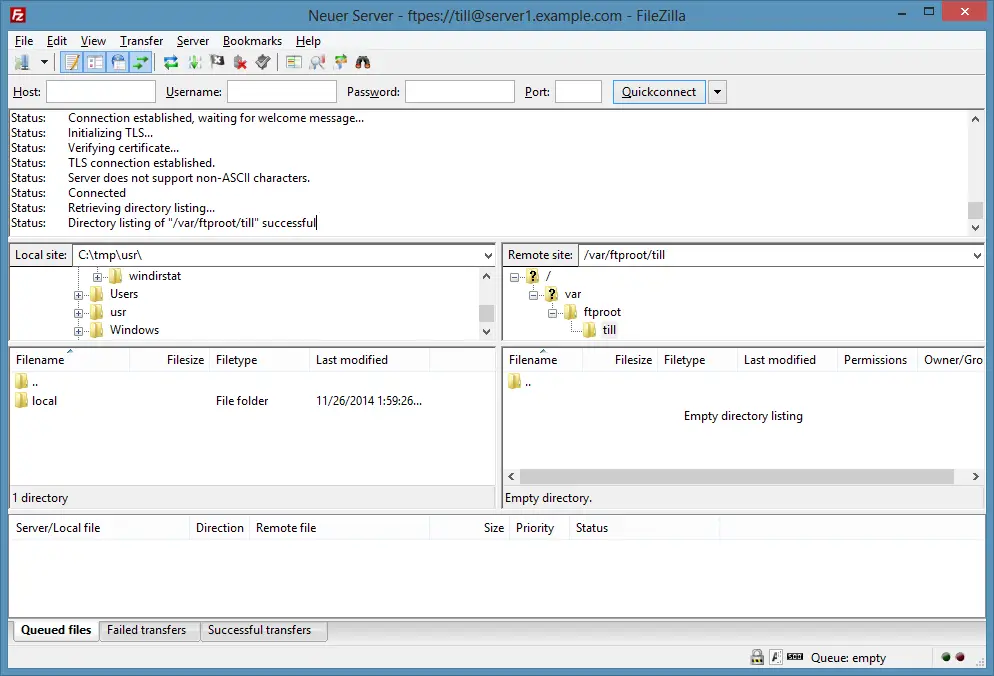
If everything goes well, you should now be logged in on the server:
7 Links
- vsftpd: https://security.appspot.com/vsftpd.html
- FileZilla: http://filezilla-project.org/
- Debian: http://www.debian.org/

