How to Install Kolab Groupware Server on CentOS 7
Kolab is a free open source groupware server. It is a scalable and reliable collaborative software that provides shared email, calendar, address books, tasks and a file cloud. Kolab supports several client environments: on Windows you can use Outlook, on Linux, you can use KDE Kontact, on all OS that have a web browser you can use the web interface. Kolab is a secure groupware solution that uses the IMAP protocol for email and LDAP as the backend to store the users, configuration and contact details.
In this tutorial, we will install Kolab groupware on a CentOS 7 server.
Prerequisite
- CentOS 7 server - 64bit.
- Root privileges.
Step 1 - Disable SELINUX
According to the Kolab Documentation, not all Kolab modules are compatible with SELinux, therefore, we have to disable SELinux first. Hopefully, this changes in future as SELinux is an important aspect to keep servers secure. To disable SELinux, we have to edit the file '/etc/selinux/config' with vim editor and then change enforcing or permissive to disabled.
vim /etc/selinux/config
Change the SELINUX value to disabled.
SELINUX=disabled
Save the file and exit.
Step 2 - Configure Firewalld
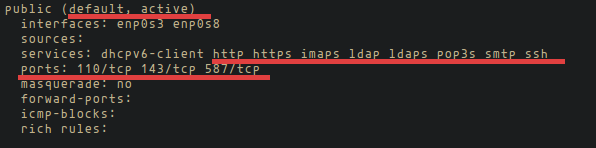
On CentOS 7 we will turn on the firewalld. We will configure firewalld and open some ports that are required by Kolab. By default, firewalld is disabled and we need to turn it on and make sure it's run at the boot time.
Start firewalld and enable it to start at boot time:
systemctl enable firewalld
systemctl start firewalld
Firewalld is started. Now we have to open some ports for Kolab. Create a new bash file named 'firewall_cmd.sh' with the vim editor.
cd ~/
vim firewall_cmd.sh
Paste the bash script below:
#!/bin/sh
for s in ssh http https pop3s imaps smtp ldap ldaps
do
    firewall-cmd --permanent --add-service=$s
done
for p in 110/tcp 143/tcp 587/tcp
do
    firewall-cmd --permanent --add-port=$p
done
firewall-cmd --reload
Save the file and exit.
Now make the script executable and run it:
chmod +x firewall_cmd.sh
./firewall_cmd.sh
The script will open the firewall ports for HTTP, HTTPS, IMAPS, LDAP, LDAPS, POP3S, SMTP and SSH.
We can check it with the command below:
firewall-cmd --list-all
Step 3 - Configure the domain (FQDN)
The FQDN or Fully Qualified Domain Name is an absolute domain name for the host or computer on the internet. It consists of two main parts, the hostname, and the domain. In this tutorial, I will use the hostname "madhouse" and the domain name "kolab.me". This results in the server FQDN "madhouse.kolab.me". This just the FQDN of my test server, you should use a FQDN based on your own domain name here.
To check your hostname, you can use command below:
hostname
Edit the /etc/hosts file to configure FQDN on the server:
vim /etc/hosts
Add your IP (or edit the line with your IP, if it is already there), then add your hostname + domain name and then your hostname:
IPADDRESS madhouse.kolab.me madhouse
Save and exit.
Next edit the file /etc/sysconfig/network.
vim /etc/sysconfig/network
And add the hostname there too:
madhouse
Save and exit.
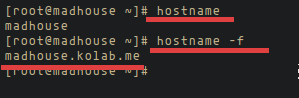
Now check the hostname and FQDN again with (it might be nescessary to reboot if the new name does not show up yet):
hostname
hostname -f
The FQDN configuration is done.
Step 4 - Install EPEL Repository
Install the EPEL repository with this rpm command:
rpm -Uhv https://dl.fedoraproject.org/pub/epel/epel-release-latest-7.noarch.rpm
Then install plugin-priorities.
yum install -y yum-plugin-priorities
The next step is installing Kolab.
Step 5 - Install and Configure Kolab
Add the Kolab repository to your Centos server by downloading the repository file to the yum.repos.d directory.
cd /etc/yum.repos.d/
wget http://obs.kolabsys.com/repositories/Kolab:/16/CentOS_7/Kolab:16.repo
Ensure the Kolab repository has a higher priority than the other repositories like EPEL etc.
for f in /etc/yum.repos.d/Kolab*.repo; do echo "priority = 60" >> $f; done
Next, import the GPG key that is used to sign the packages.
rpm --import https://ssl.kolabsys.com/community.asc
And install Kolab with this command:
yum -y install kolab
Wait until the installation process is finished. Now we have to configure Kolab by configuring the LDAP password, the domain name, the MySQL password etc. We can do that with setup-kolab command:
setup-kolab
You will be asked to type in the password for the LDAP administrator user "admin", make sure that your password is strong. I recommended to use a long password.
Administrator password [3HQM01i8oUa9LUB]: TYPE YOUR PASSWORD
Confirm Administrator password: CONFIRM
Directory manager password configuration.
Directory Manager password [DLQjpdhyUOlwljy]: TYPE YOUR PASSWORD
Confirm Directory Manager password: CONFIRM
We can use the default user for Kolab, Kolab will run as 'nobody'.
User [nobody]: Press Enter
Group [nobody]: Press Enter
Next, we will be asked about the domain name. The domain name is obtained from the reverse DNS (rDNS), make sure you have it in your DNS configuration.
kolab.me [Y/n]: Y
dc=kolab,dc=me [Y/n]: Y
Now configure the Cyrus administrator password. The password is used by Kolab to execute some tasks by Cyrus IMAP.
Cyrus Administrator password [GH8pw5CdNaQIBv5]: TYPE YOUR PASSWORD
Confirm Cyrus Administrator password: CONFIRM
Then configure the Kolab service password, this is used by some services like a postfix, roundcobe.
Kolab Service password [sTeZFB-7nxS6Osg]: TYPE YOUR PASSWORD
Confirm Kolab Service password: CONFIRM
Now all services will start. Then we have to configure the MySQL password for Kolab.
What MySQL server are we setting up?
 - 1: Existing MySQL server (with root password already set).
 - 2: New MySQL server (needs to be initialized).
Choice: 1
Enter your MySQL root password.
MySQL root password:
Next configure the MySQL password for user "kolab".
MySQL kolab password [4quZUHanM7b3bHF]: TYPE YOUR PASSWORD
Confirm MySQL kolab password: CONFIRM
Timezone configuration: type in your timezone.
Timezone ID [UTC]: Asia/Jakarta
And finally the password for the MySQL user 'roundcube'. This password will be used by the Roundcube webmail interface.
MySQL roundcube password [IuCKSeFk_udD9-G]: TYPE YOUR PASSWORD
Confirm MySQL roundcube password: CONFIRM
Kolab is installed and configured. Now you can visit the Kolab admin: IP/kolab-webadmin/.
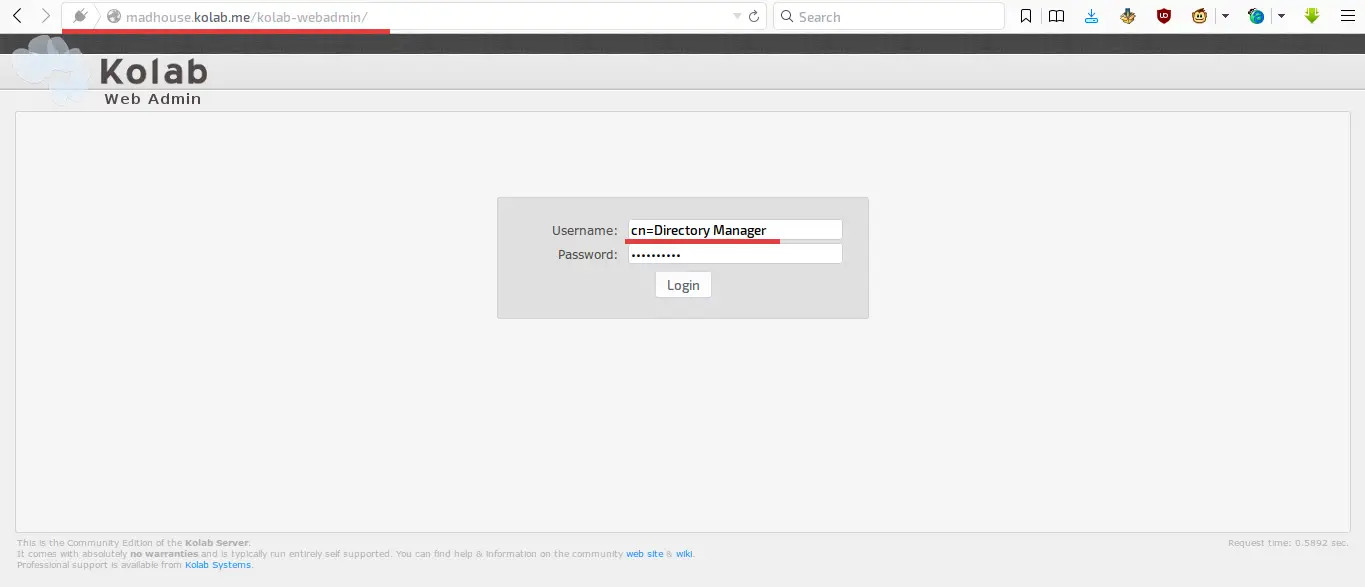
Login with username and password:
username = cn=Directory Manager
Password = YOUR PASSWORD
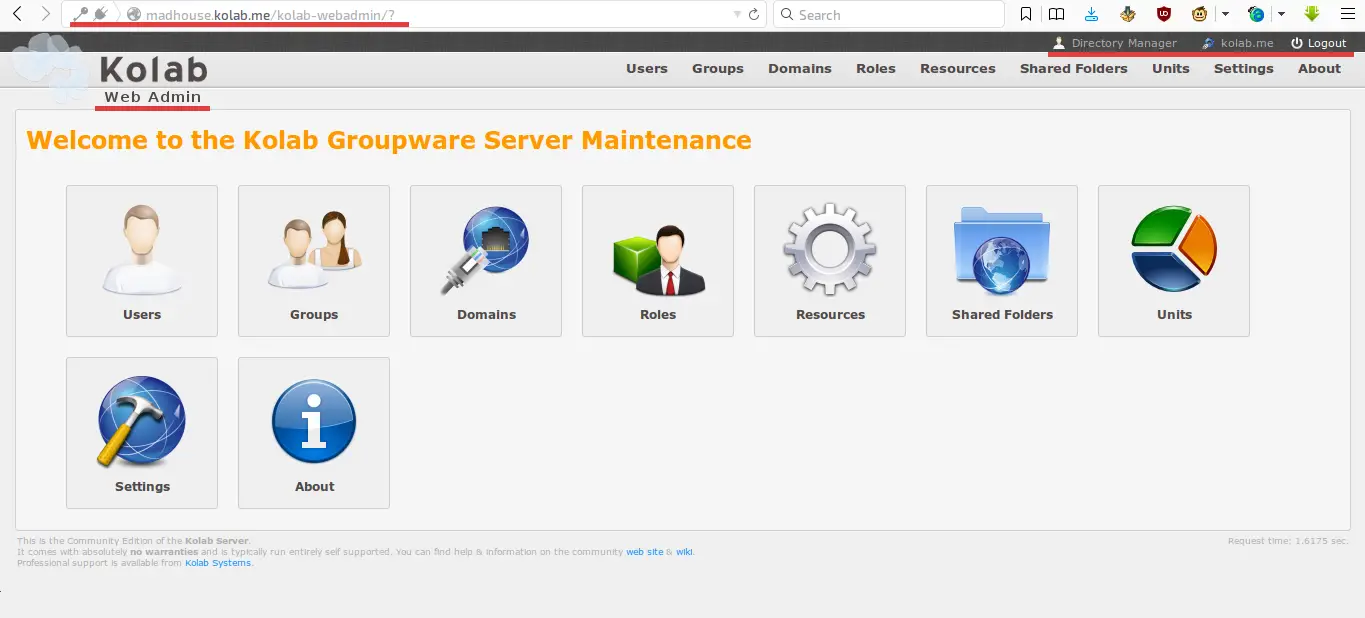
And then you will see the Kolab admin page.
Done. Kolab is installed and configured so we can start using it.
Conclusion
Kolab is an open source groupware server that provides a shared email, calendar, and address book service. On the server side, Kolb can be installed on Ubuntu, Centos or Debian easily. On the client side, we can use Windows with Outlook, Linux with KDE Kontact, or we can use a web browser. Kolab is simple and easy to use: for the installation, we just need to configure the server FQDN correctly and then add the Kolab repository and install it.

