In this tutorial, we are going to explain in step-by-step detail how to install Nextcloud on Ubuntu 24.04
Nextcloud is a client-server software written in PHP and Javascript that stores data. Its functionality is similar to that of Dropbox, Google Drive, and Office 365. Nextcloud uses MySQL, PostgreSQL, or SQLite to store the data. It can be installed on different operating systems and offers a variety of features such as multi-factor authentication, monitoring capabilities, full-text search, etc. In this blog post, we will install Nextcloud and the LAMP stack.
Installing Nextcloud on Ubuntu 24.04 is straightforward and may take up to 15 minutes. Let’s get started!
Table of Contents
Prerequisites
- A server running Ubuntu 24.04 or any Linux OS
- User privileges: root or non-root user with sudo privileges
Step 1. Update the system
We assume you have a fresh installation of Ubuntu 24.04. We need to update the system packages to the latest versions available. To do that, execute the following commands:
sudo apt update -y && sudo apt upgrade -y
Step 2. Install LAMP stack
The first installation of the LAMP stack will be the Apache web server. To install Apache, execute the following command:
sudo apt install apache2 -y
p>After installation, start and enable the service:
sudo systemctl start apache2 && sudo systemctl enable apache2
If everything is ok, check the status of the service:
sudo systemctl status apache2
You should get output similar to this:
root@host:~# sudo systemctl status apache2
● apache2.service - The Apache HTTP Server
     Loaded: loaded (/usr/lib/systemd/system/apache2.service; enabled; preset: enabled)
     Active: active (running) since Fri 2024-03-15 06:24:38 CDT; 6s ago
       Docs: https://httpd.apache.org/docs/2.4/
   Main PID: 99023 (apache2)
      Tasks: 6 (limit: 4624)
     Memory: 13.7M (peak: 14.1M)
        CPU: 161ms
     CGroup: /system.slice/apache2.service
             ├─99023 /usr/sbin/apache2 -k start
             ├─99032 /usr/sbin/apache2 -k start
             ├─99033 /usr/sbin/apache2 -k start
             ├─99034 /usr/sbin/apache2 -k start
             ├─99035 /usr/sbin/apache2 -k start
             └─99037 /usr/sbin/apache2 -k start

Mar 15 06:24:38 host.test.vps systemd[1]: Starting apache2.service - The Apache HTTP Server...
Next, we will install the MariaDB database server. Execute the command below:
sudo apt install mariadb-server -y
Once the MariaDB server is installed, we need to start and enable the service:
sudo systemctl start mariadb && sudo systemctl enable mariadb
To check the status of the service, execute the following command:
sudo systemctl status mariadb
You should get output similar to this:
root@host:~# sudo systemctl status mariadb
● mariadb.service - MariaDB 10.11.6 database server
     Loaded: loaded (/usr/lib/systemd/system/mariadb.service; enabled; preset: enabled)
     Active: active (running) since Fri 2024-03-15 06:40:06 CDT; 49s ago
       Docs: man:mariadbd(8)
             https://mariadb.com/kb/en/library/systemd/
   Main PID: 100980 (mariadbd)
     Status: "Taking your SQL requests now..."
      Tasks: 10 (limit: 4624)
     Memory: 78.4M (peak: 81.6M)
        CPU: 1.024s
     CGroup: /system.slice/mariadb.service
             └─100980 /usr/sbin/mariadbd
The last part of the LAMP stack will be PHP8.3, along with its extensions. To install PHP8.3, execute the command below:
sudo apt install php8.3 libapache2-mod-php php8.3-common php8.3-cli php8.3-mbstring php8.3-bcmath php8.3-fpm php8.3-mysql php8.3-zip php8.3-gd php8.3-curl php8.3-xml -y
Once installed, you can check the PHP version with the command below:
php -v
You should get the following output:
root@host:~# php -v
PHP 8.3.0-1ubuntu1 (cli) (built: Jan 19 2024 14:00:34) (NTS)
Copyright (c) The PHP Group
Zend Engine v4.3.0, Copyright (c) Zend Technologies
    with Zend OPcache v8.3.0-1ubuntu1, Copyright (c), by Zend Technologies
Step 3. Nextcloud database and user
Next, we will create the Nextcloud database, and Nextcloud user and will assign privileges to that user and database. The database and the user will be with the same name nextcloud.
MariaDB [(none)]> CREATE DATABASE nextcloud;
MariaDB [(none)]> GRANT ALL PRIVILEGES ON nextcloud.* TO 'nextcloud'@'localhost' IDENTIFIED BY 'YourStrongPasswordHere';
MariaDB [(none)]> FLUSH PRIVILEGES;
MariaDB [(none)]> EXIT;
Step 4. Download Nextcloud
The LAMP stack is ready and the database is created. Now we need to download the latest Nextcloud version and place it into the Apache document root.
wget https://download.nextcloud.com/server/releases/nextcloud-28.0.3.zip
Once downloaded, extract it into the Apache Document root.
unzip nextcloud-28.0.3.zip -d /var/www/html/
Set the correct file and folder ownership:
chown -R www-data:www-data /var/www/html/nextcloud
Step 5. Create Apache Virtual Host File
The next thing is to create an Apache virtual host file to server the Nextcloud files so we can access it via a domain name:
touch /etc/apache2/sites-available/nextcloud.conf
Open the created file with your favorite editor and paste the following lines of code:
<VirtualHost *:80>
        DocumentRoot "/var/www/html/nextcloud"
        ServerName YourDomainNameHere
        ErrorLog ${APACHE_LOG_DIR}/nextcloud.error
        CustomLog ${APACHE_LOG_DIR}/nextcloud.access combined
                <Directory /var/www/html/nextcloud/>
                        Require all granted
                        Options FollowSymlinks MultiViews
                        AllowOverride All
                </Directory>
</VirtualHost>
Save the file, close it, and enable the website.
a2ensite nextcloud.conf
Next, enable the required Apache modules with the following command:
a2enmod rewrite headers env dir mime setenvif ssl
Check the Apache Syntax:
apachectl -t
If everything is OK, you should receive the following output:
root@host:# apachectl -t
Syntax OK
Restart the Apache web server:
sudo systemctl restart apache2
Step 6. Finish Nextcloud Installation
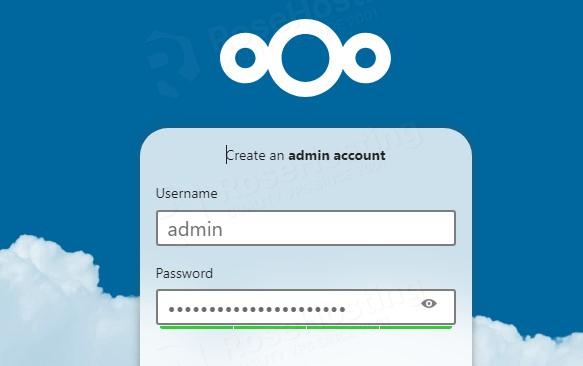
We are at the last step of this tutorial. That is finishing the Installation. To do that, first access your Nextcloud installation at the following URL: http://YourDomainNameHere
First, we must set up a Nextcloud administrator username and strong password.
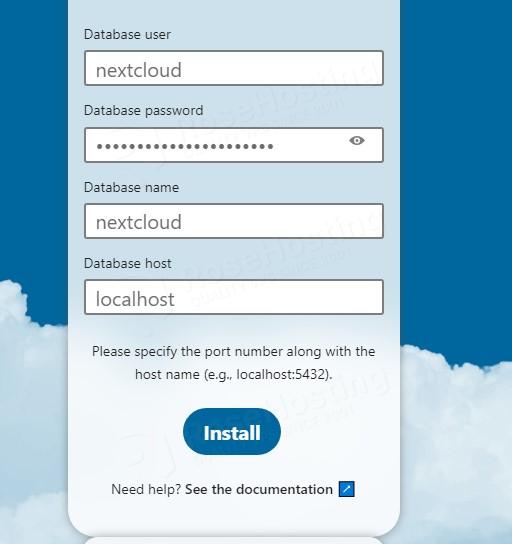
Scroll down and fill in the database credentials you created in Step 3. After that, click on the blue Install button.
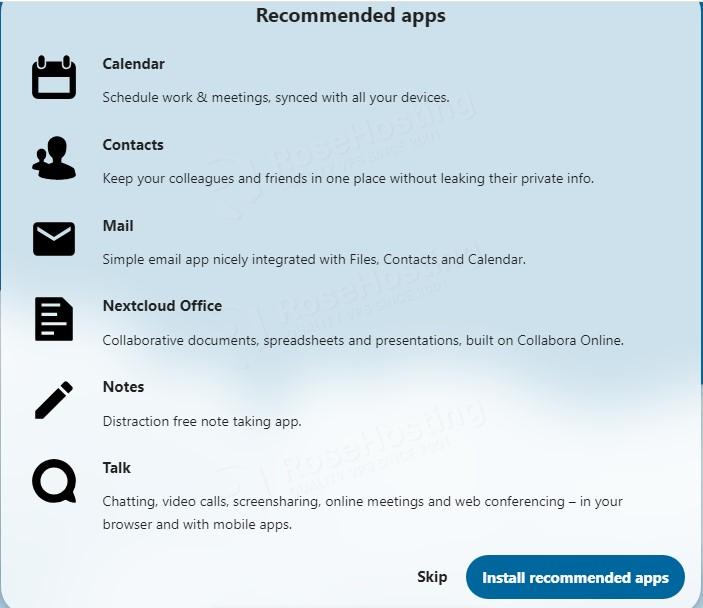
After some time, the installation process will take you to the application recommendations page. Click on the Install recommend apps button.
The applications will be installed in less than a minute and will take you to the admin dashboard.
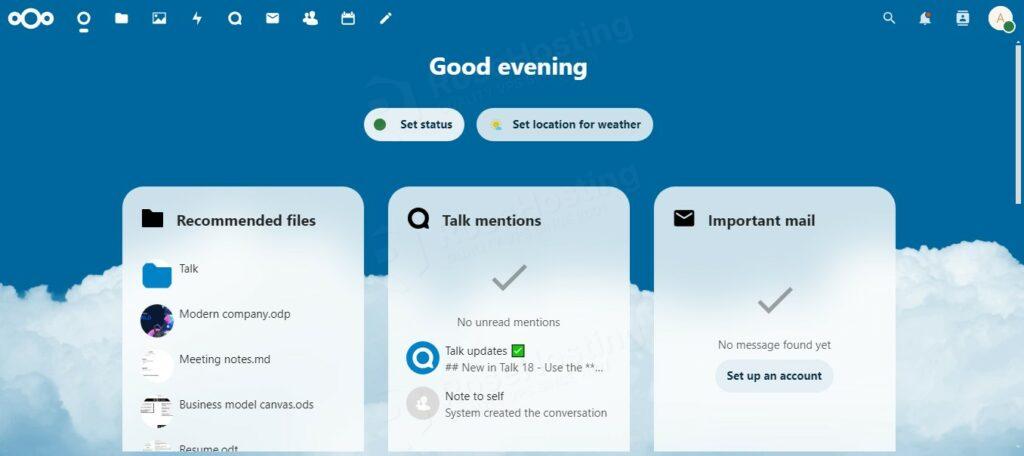
That’s it. You successfully learned how to install Nextcloud on Ubuntu 24.04. Of course, you do not have to do this on your own. You only need to sign up for one of our NVMe VPS plans and submit a support ticket. Our admins will help you with any aspect of the Nextcloud installation on your server. Feel free to contact us. We are available 24/7.
PS. If you liked this post on installing Nextcloud on Ubuntu 24.04, please share it with your friends on social networks or leave a comment in the comments section. Thank you.